
Mapview
Some Images and descriptions might varry to the current release due to updates of the application over time. The general usage, however, should be similar.
Description
Mapview is a module used to register maintenance and observations on-site. These tasks where not planned ahead and will happen ad-hoc.
We go over the following functionalities in this module :
Map settings
Filters
Observations
Maintenance,
History
Manual
![]() Assets can be selected manually on the map or by means of the QR-function
Assets can be selected manually on the map or by means of the QR-function 
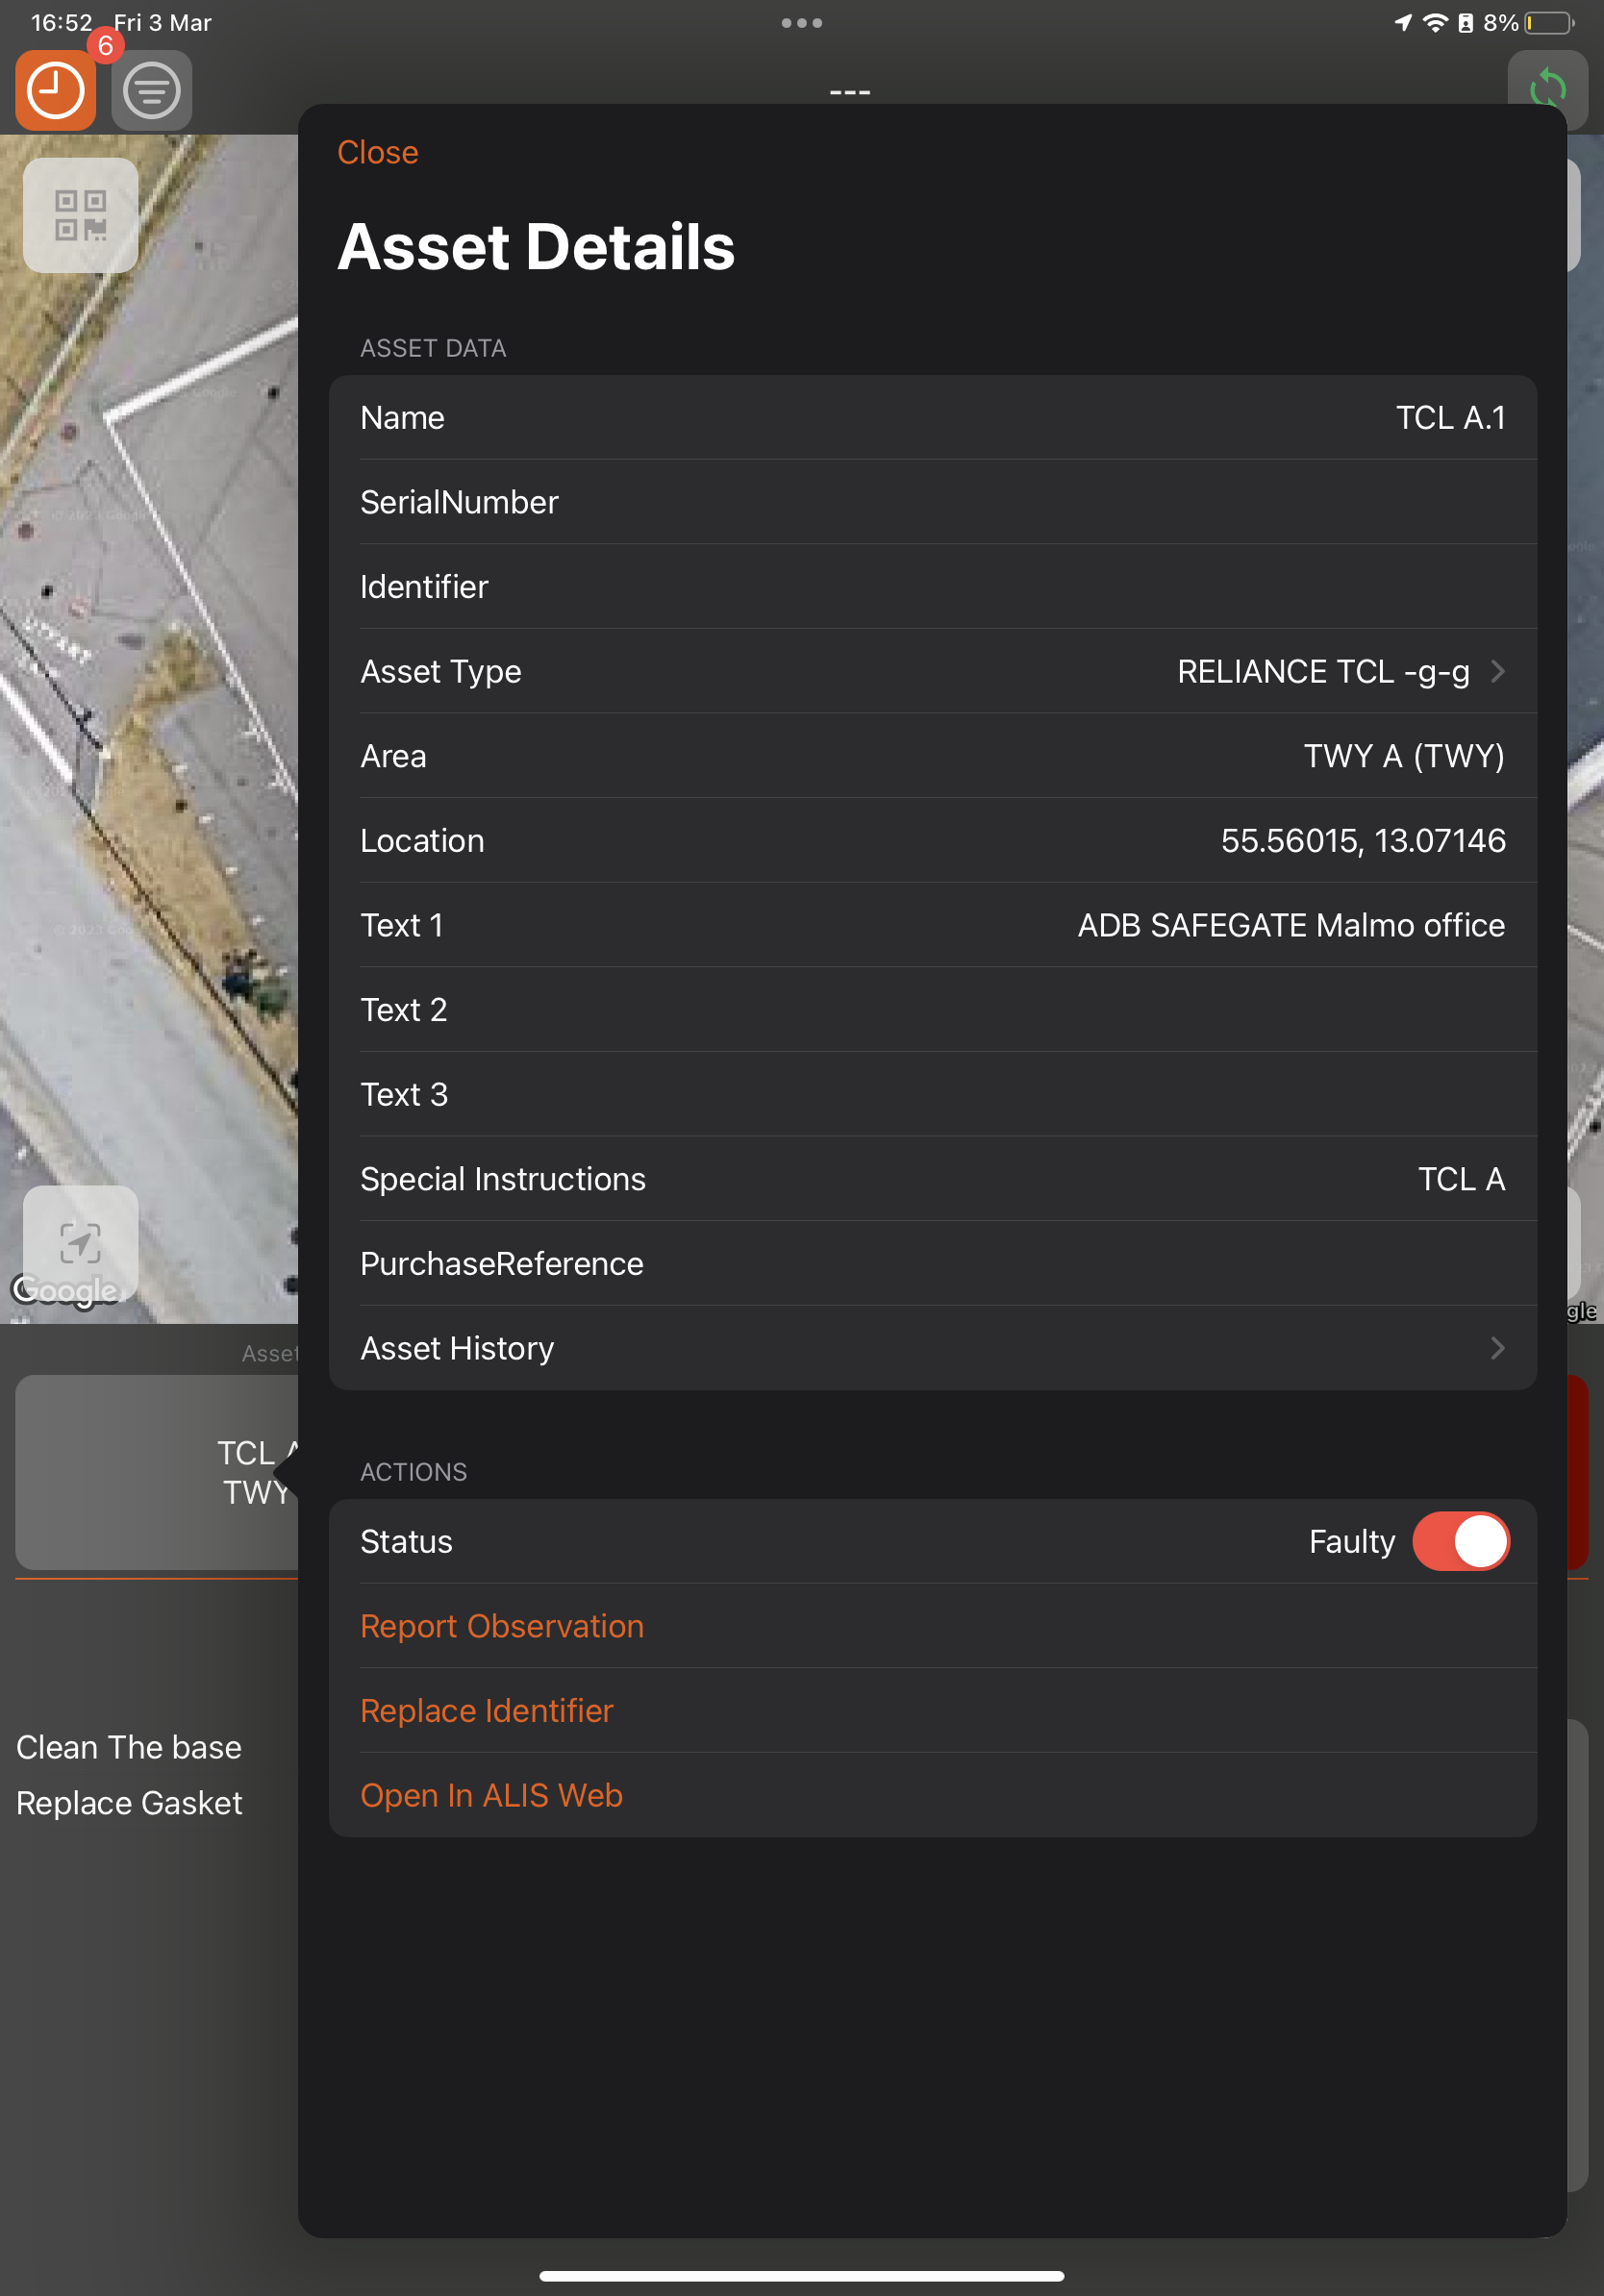
Asset information
Upon selection of an asset the details of the Asset and Asset Type can be find by accessing the corresponding buttons.
Additionally we supply
A visual representation of the asset
A direct link to the manual of that asset ( as configured in the web-portal of your CORTEX Service environment - under the properties of the Asset-type)
Map Settings
Map Settings will give you a possibility to change how you look at the map overview - what is visible and what the colors you see will represent.
These are the possible configuration settings:
Map type ( Default – Satellite view – Hybrid)
Clustering - will group the assets together , visualized by a number of how many assets are in that zone, to make navigation quicker if there are a big amount of assets in the system (+10k)
Filtered assets ( Show – Hide) - When applying a filter the un-filtered assets can appear ghosted or can be hidden completely.
Coloring - will depict what the color will mean of the asset on the map .
Asset Status : The assets will be red if they have received a Faulty flag and considered not working / faulty. The assets will be green if they are not considered faulty or in good working condition.
Maintenance status: Here we can choose from which date maintenance is considered to visualize that maintenance has already happed to it ( from the selected day forward) . If no maintenance has happen since the selected date it will be blue – if maintenance has been performed on it , it will be green. If an Observation has been reported on the asset it will show red since something must be wrong with it.
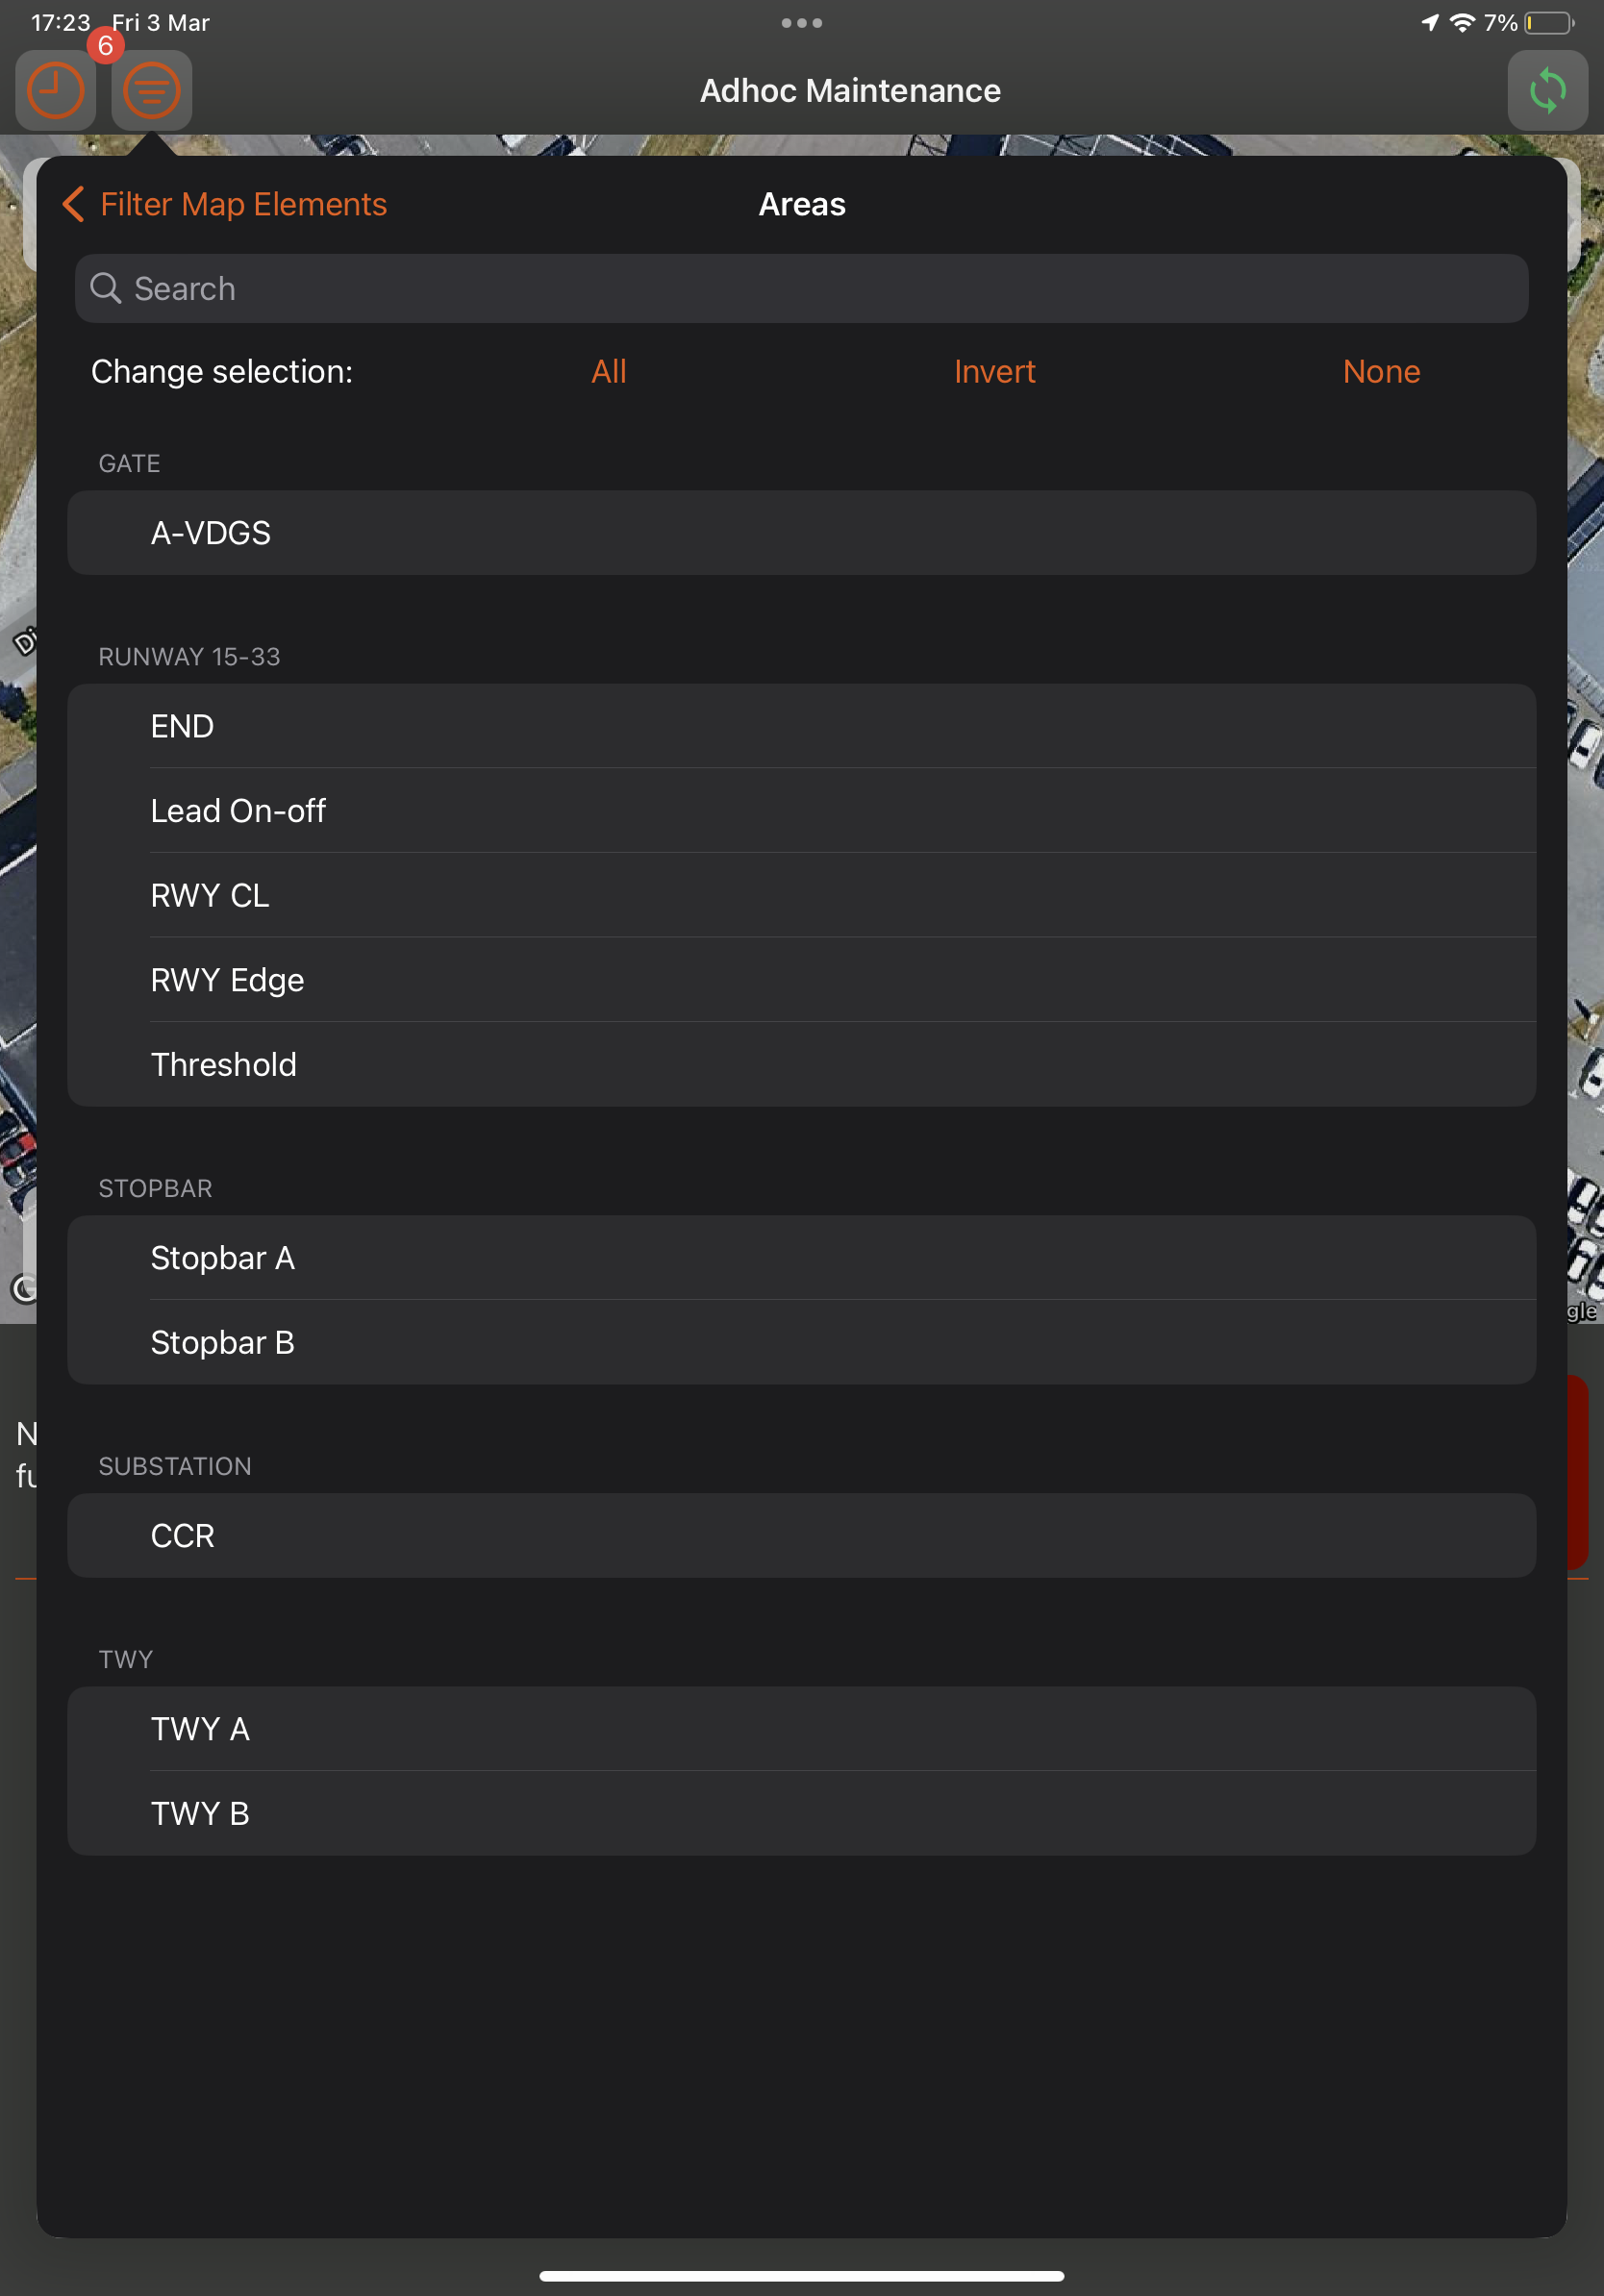
Filters
Filters allow us to find and highlight the assets which we want to work on. The following filters are possible:
Areas - you can highlight the assets in a sub-area which are categorized by area.
Asset Classes – Highlight all of the assets which are from a certain type or types.
Status (OK / faulty ) - find all of the assets that are in flagged in a faulty state or which are Ok.
Maintenance Tasks – Only hightlight the assets that have a certain maintenance task as their preventive maintenance cycle.
For each filter you can Select ALL – non or invert the selection.
The not-select assets will be display in a ghosted/outlined for location awareness of the asset that is meant to be found
Observations
Faulty light
The Map View utility allows for rapid surveying of assets and relevant areas and surroundings. The utility allows marking faulty lights and capturing of images, voice memos and written memos to elaborate on the findings.
Select the AdHoc option from the Workorder select button situated on the left side top.
or Scan or manually select the asset.
All data relevant to the scanned asset will now appear on screen.
The technician can report a malfunctioning light by tapping the Mark Asset as faulty button. Alternatively the opposite can be performed to report a light as ‘OK’ by tapping the Mark Asset as OK button.
The changes will in real-time be submitted to the server.
On the web application this asset would now be highlighted with a exclamation mark.
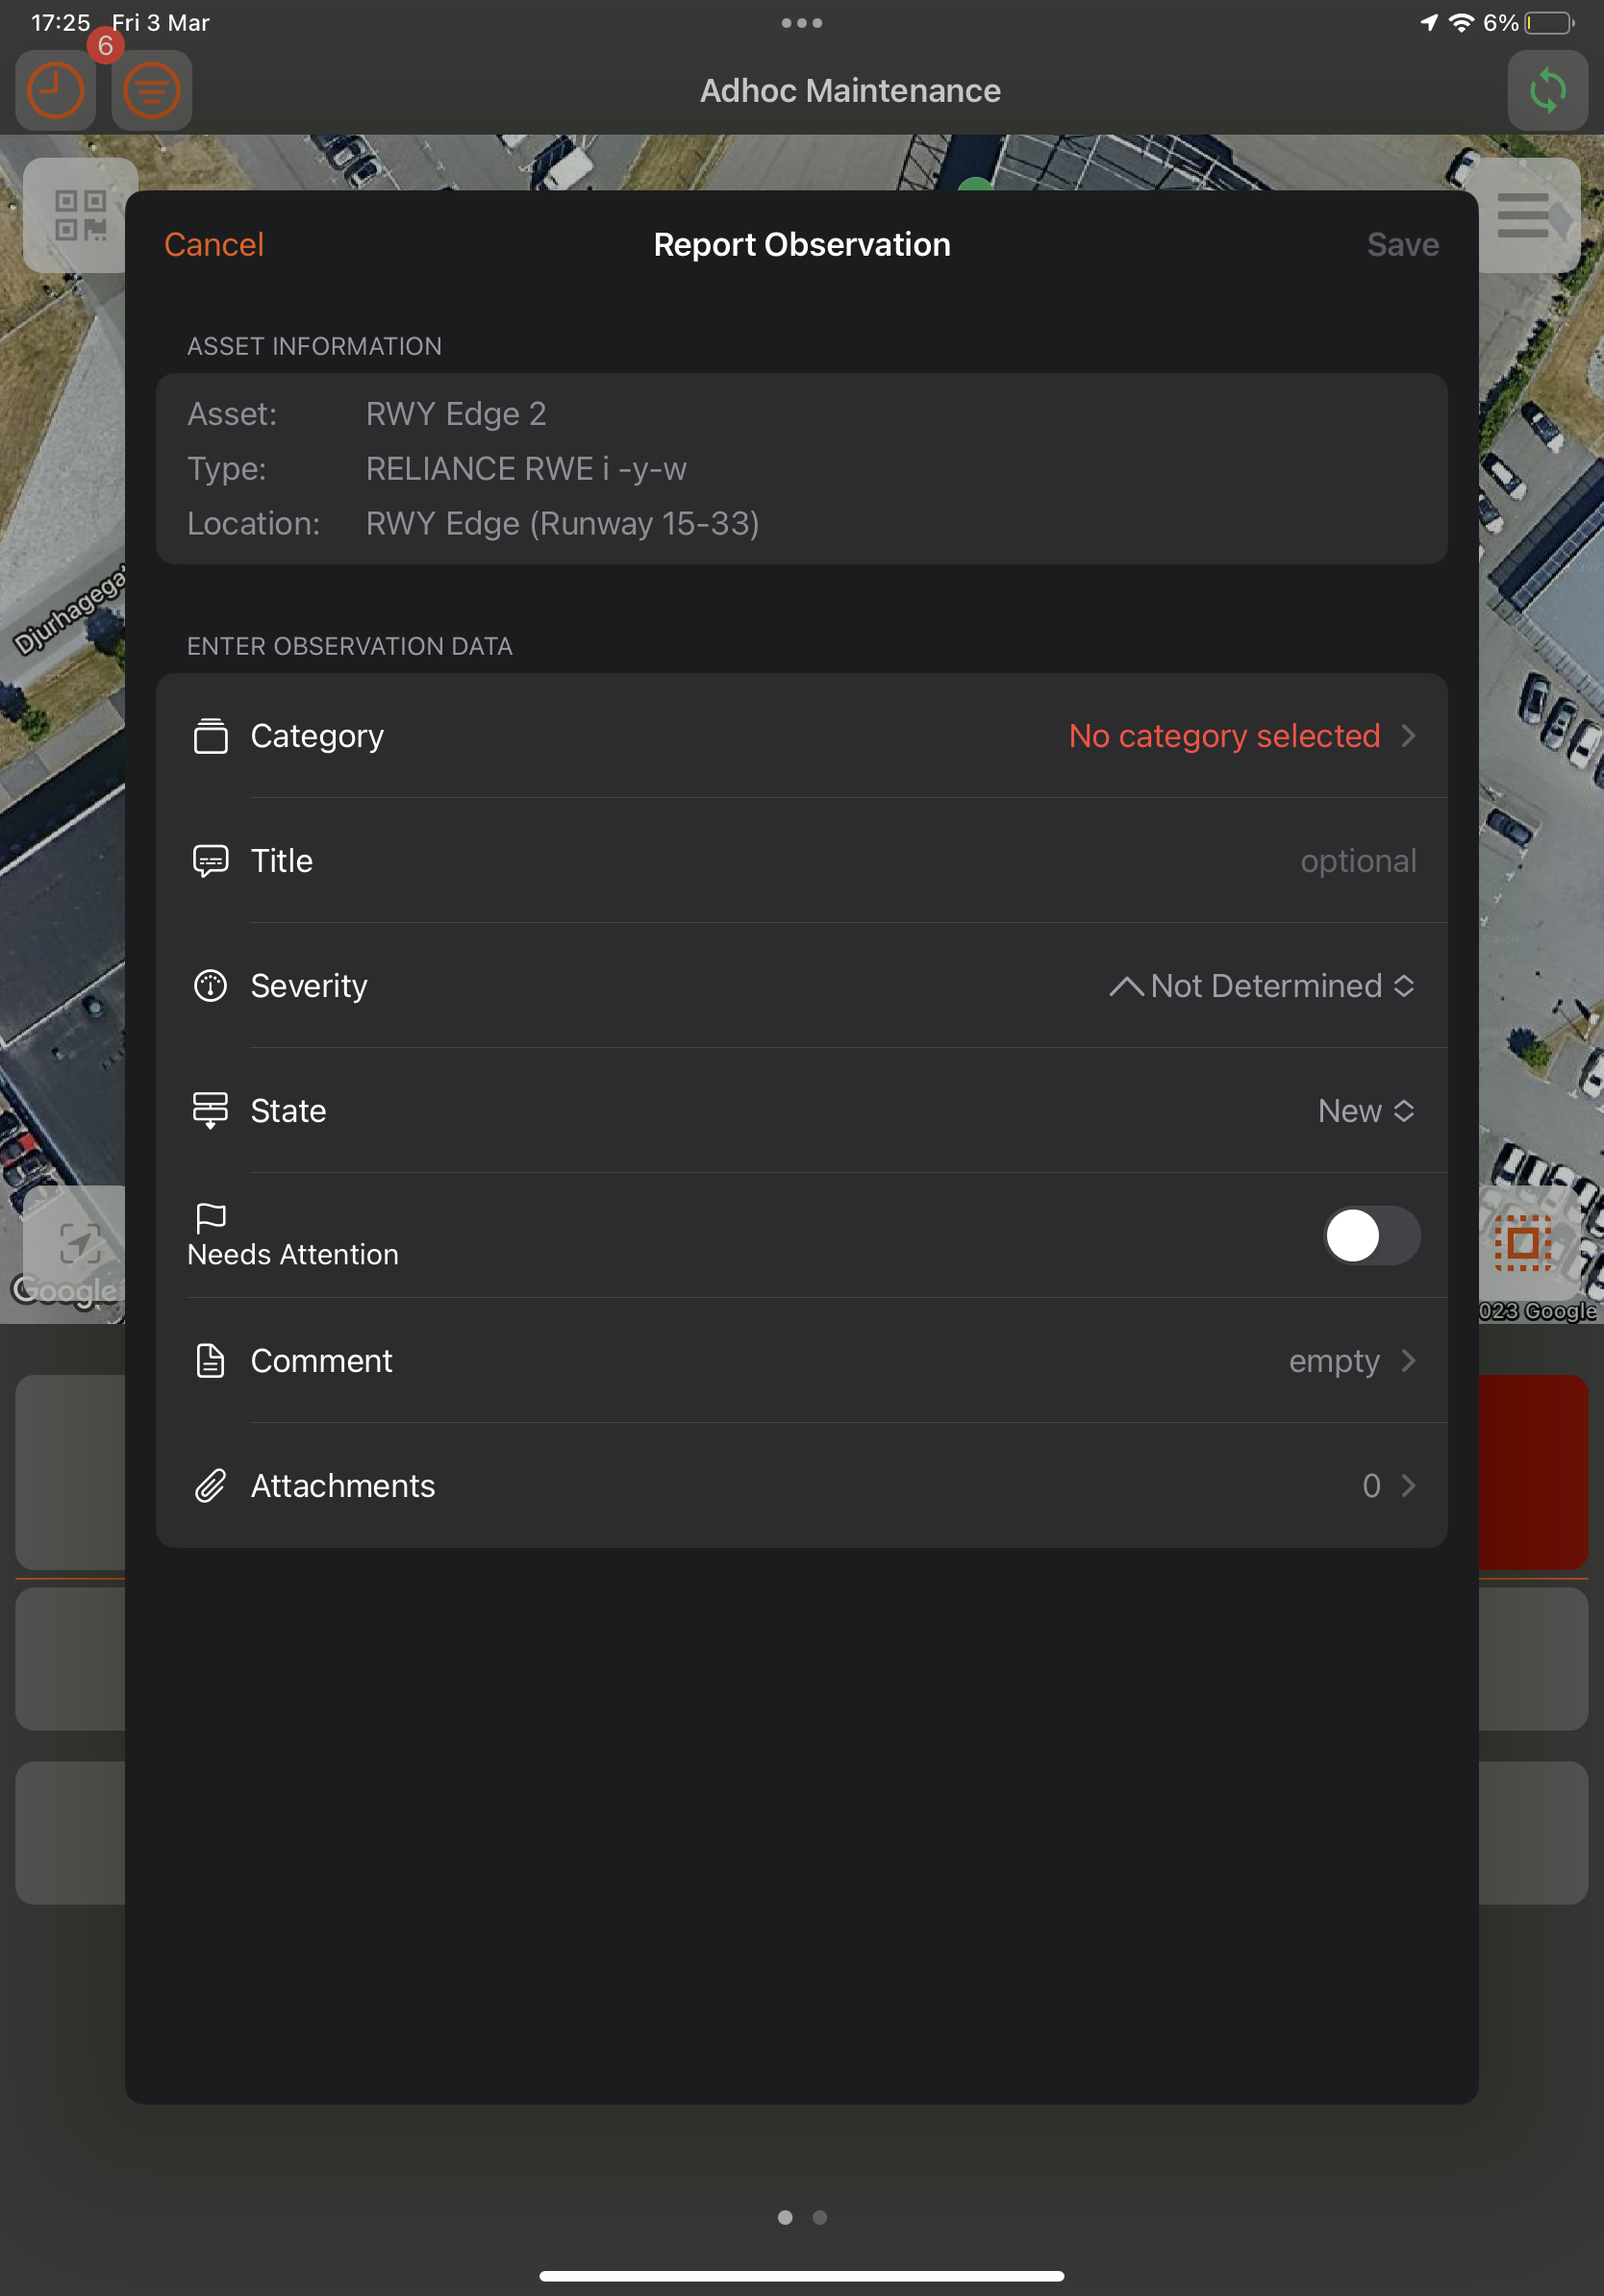
Report an observation report.
More info on On-site Observations
Tap the Report Observation button to launch the Observation report module.
Choose to enter a written Memo, Photo or Voice observation. You may switch between the different options by selecting the other tab.
Enter the relevant information, take a picture or record a voice memo respectively.
Select an appropriate SeverityLevel for your observation. This will inform the web-app users of the gravity of the reported problem.
Tap the "Save button to save the recorded data. A confirmation of submittal will pop-up. The data will synched automatically in the background.
What is Ad-Hoc Maintenance?
Ad-Hoc Maintenance is any maintenance carried out outside of a scheduled maintenance session. For example, these tasks can include the cleaning of a light fixture lens or replacing a light fixture on the spot, without that particular task being linked to a planned maintenance shift.
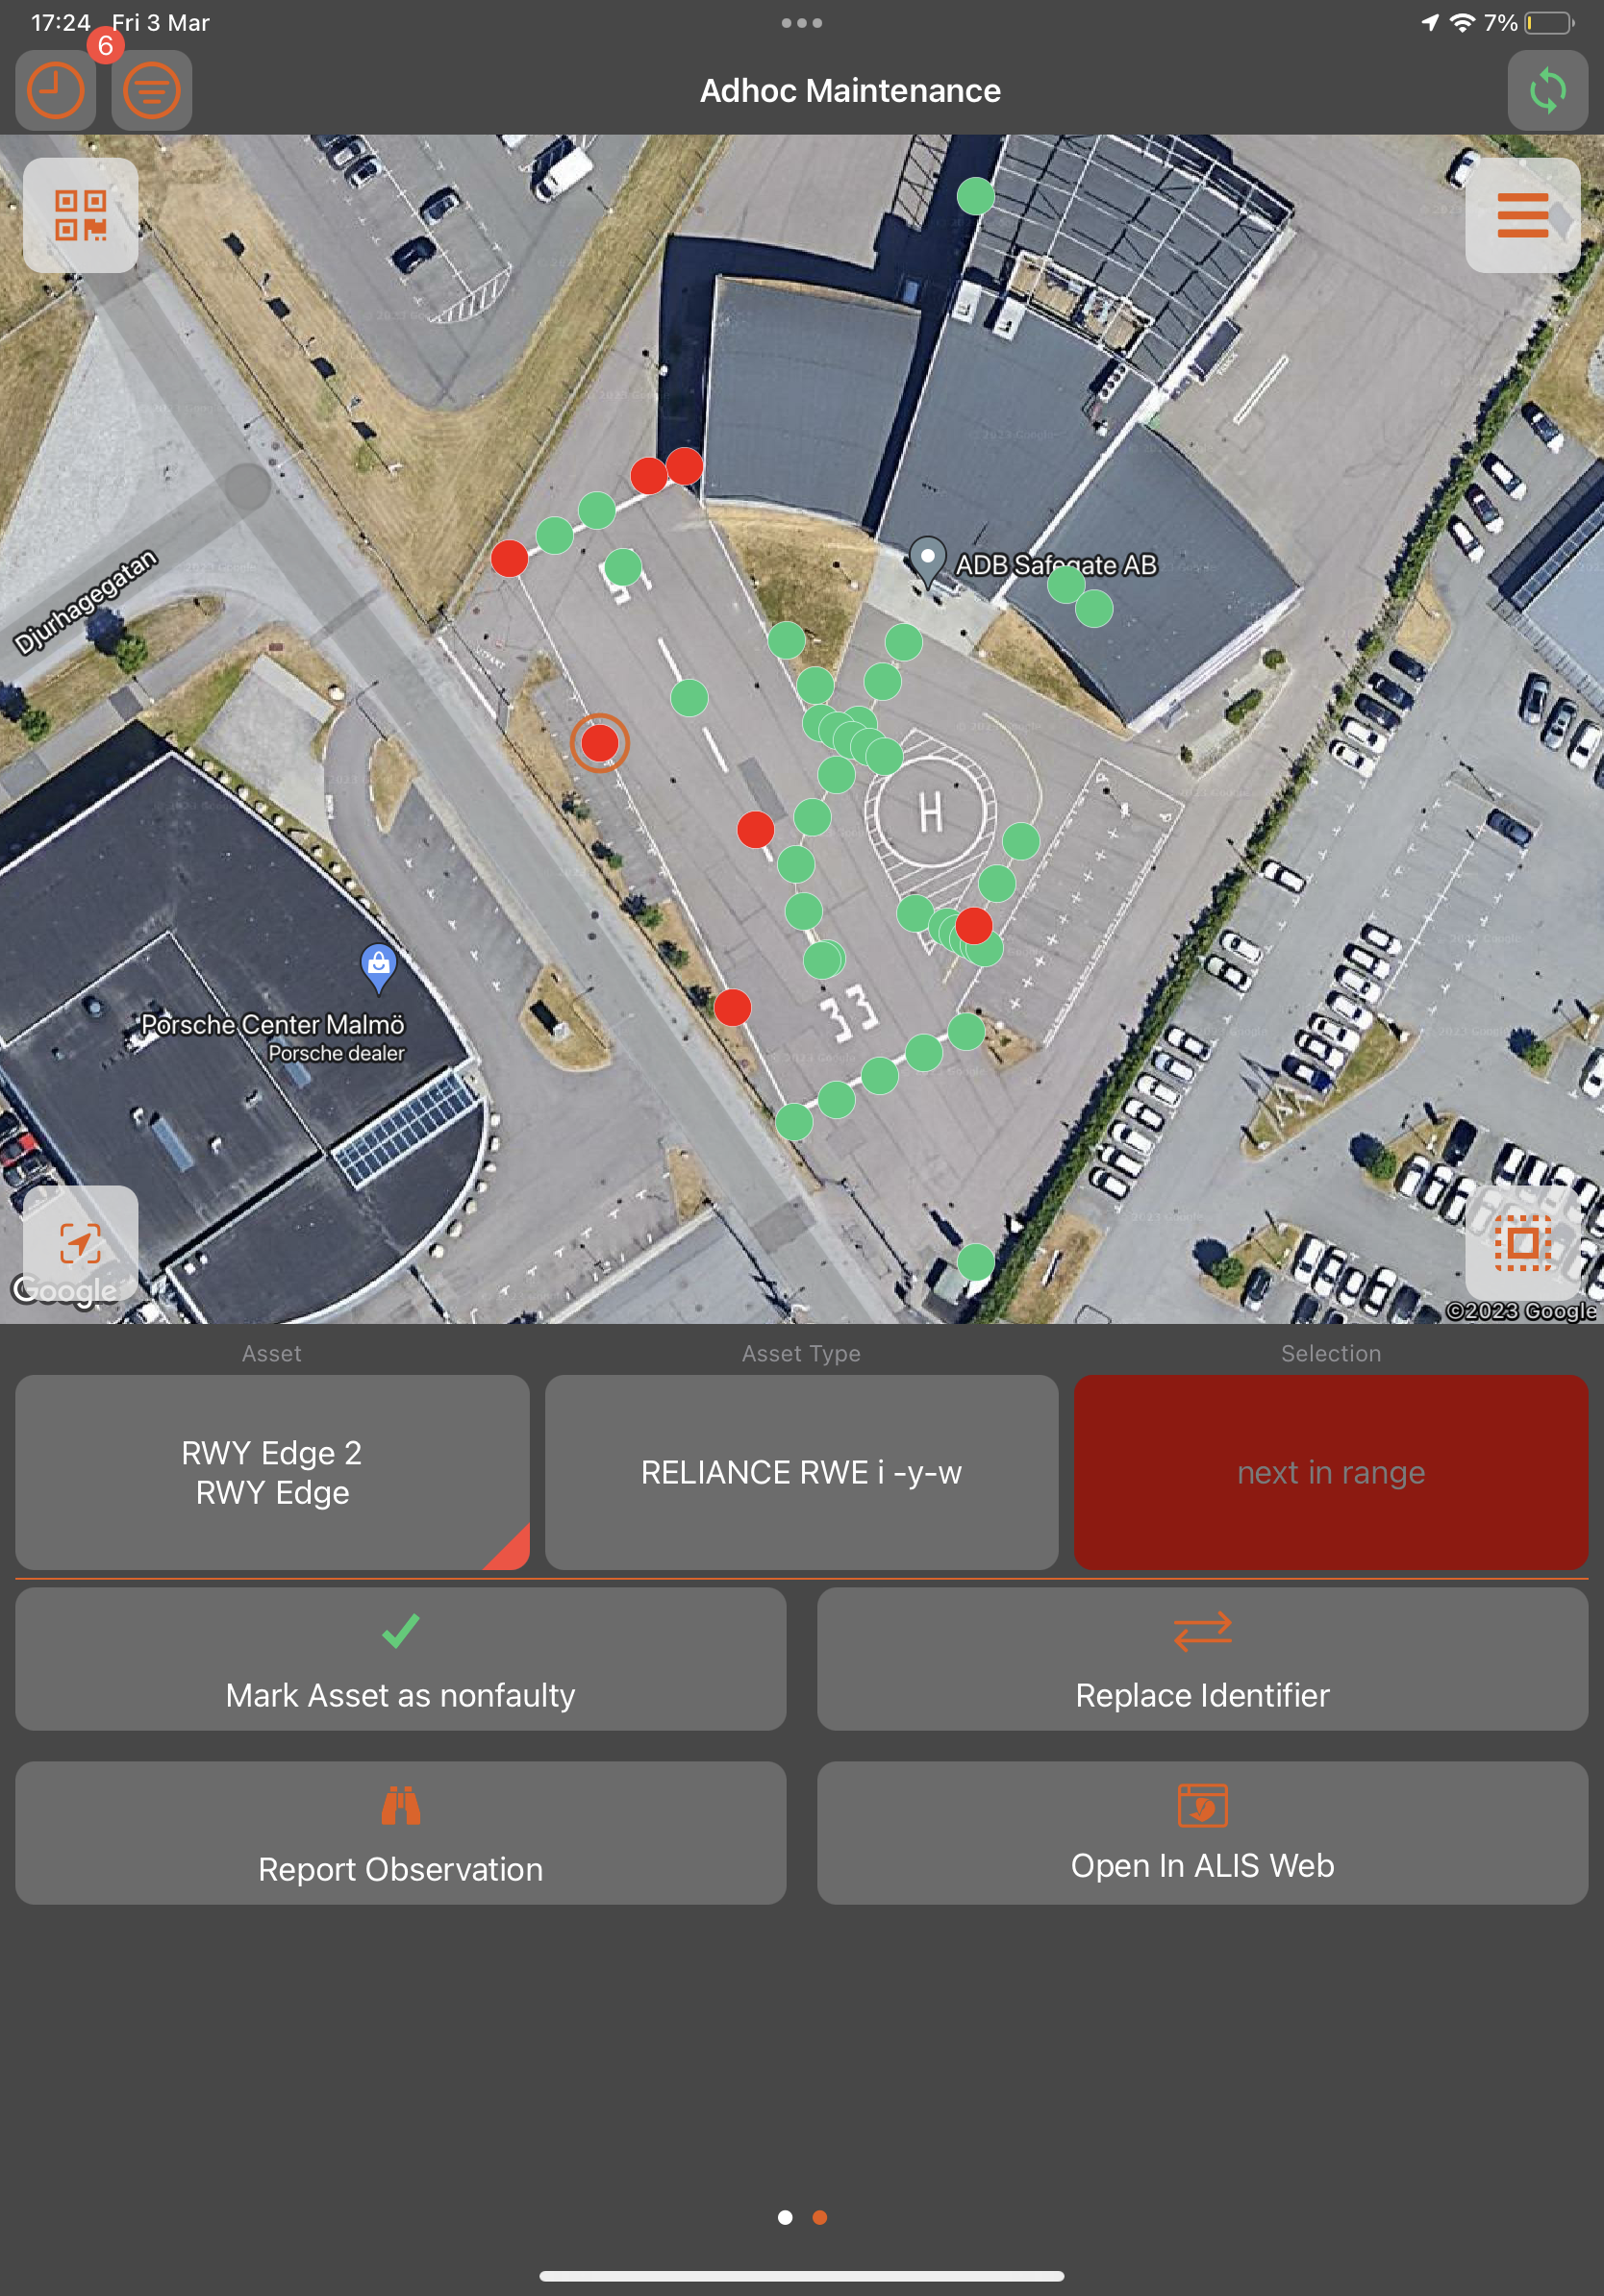
Performing Ad-Hoc Maintenance
Start an ad-hoc maintenance session by selecting the Ad-Hoc mode from this button on the top left ![]()
Follow these steps to perform ad-hoc maintenance
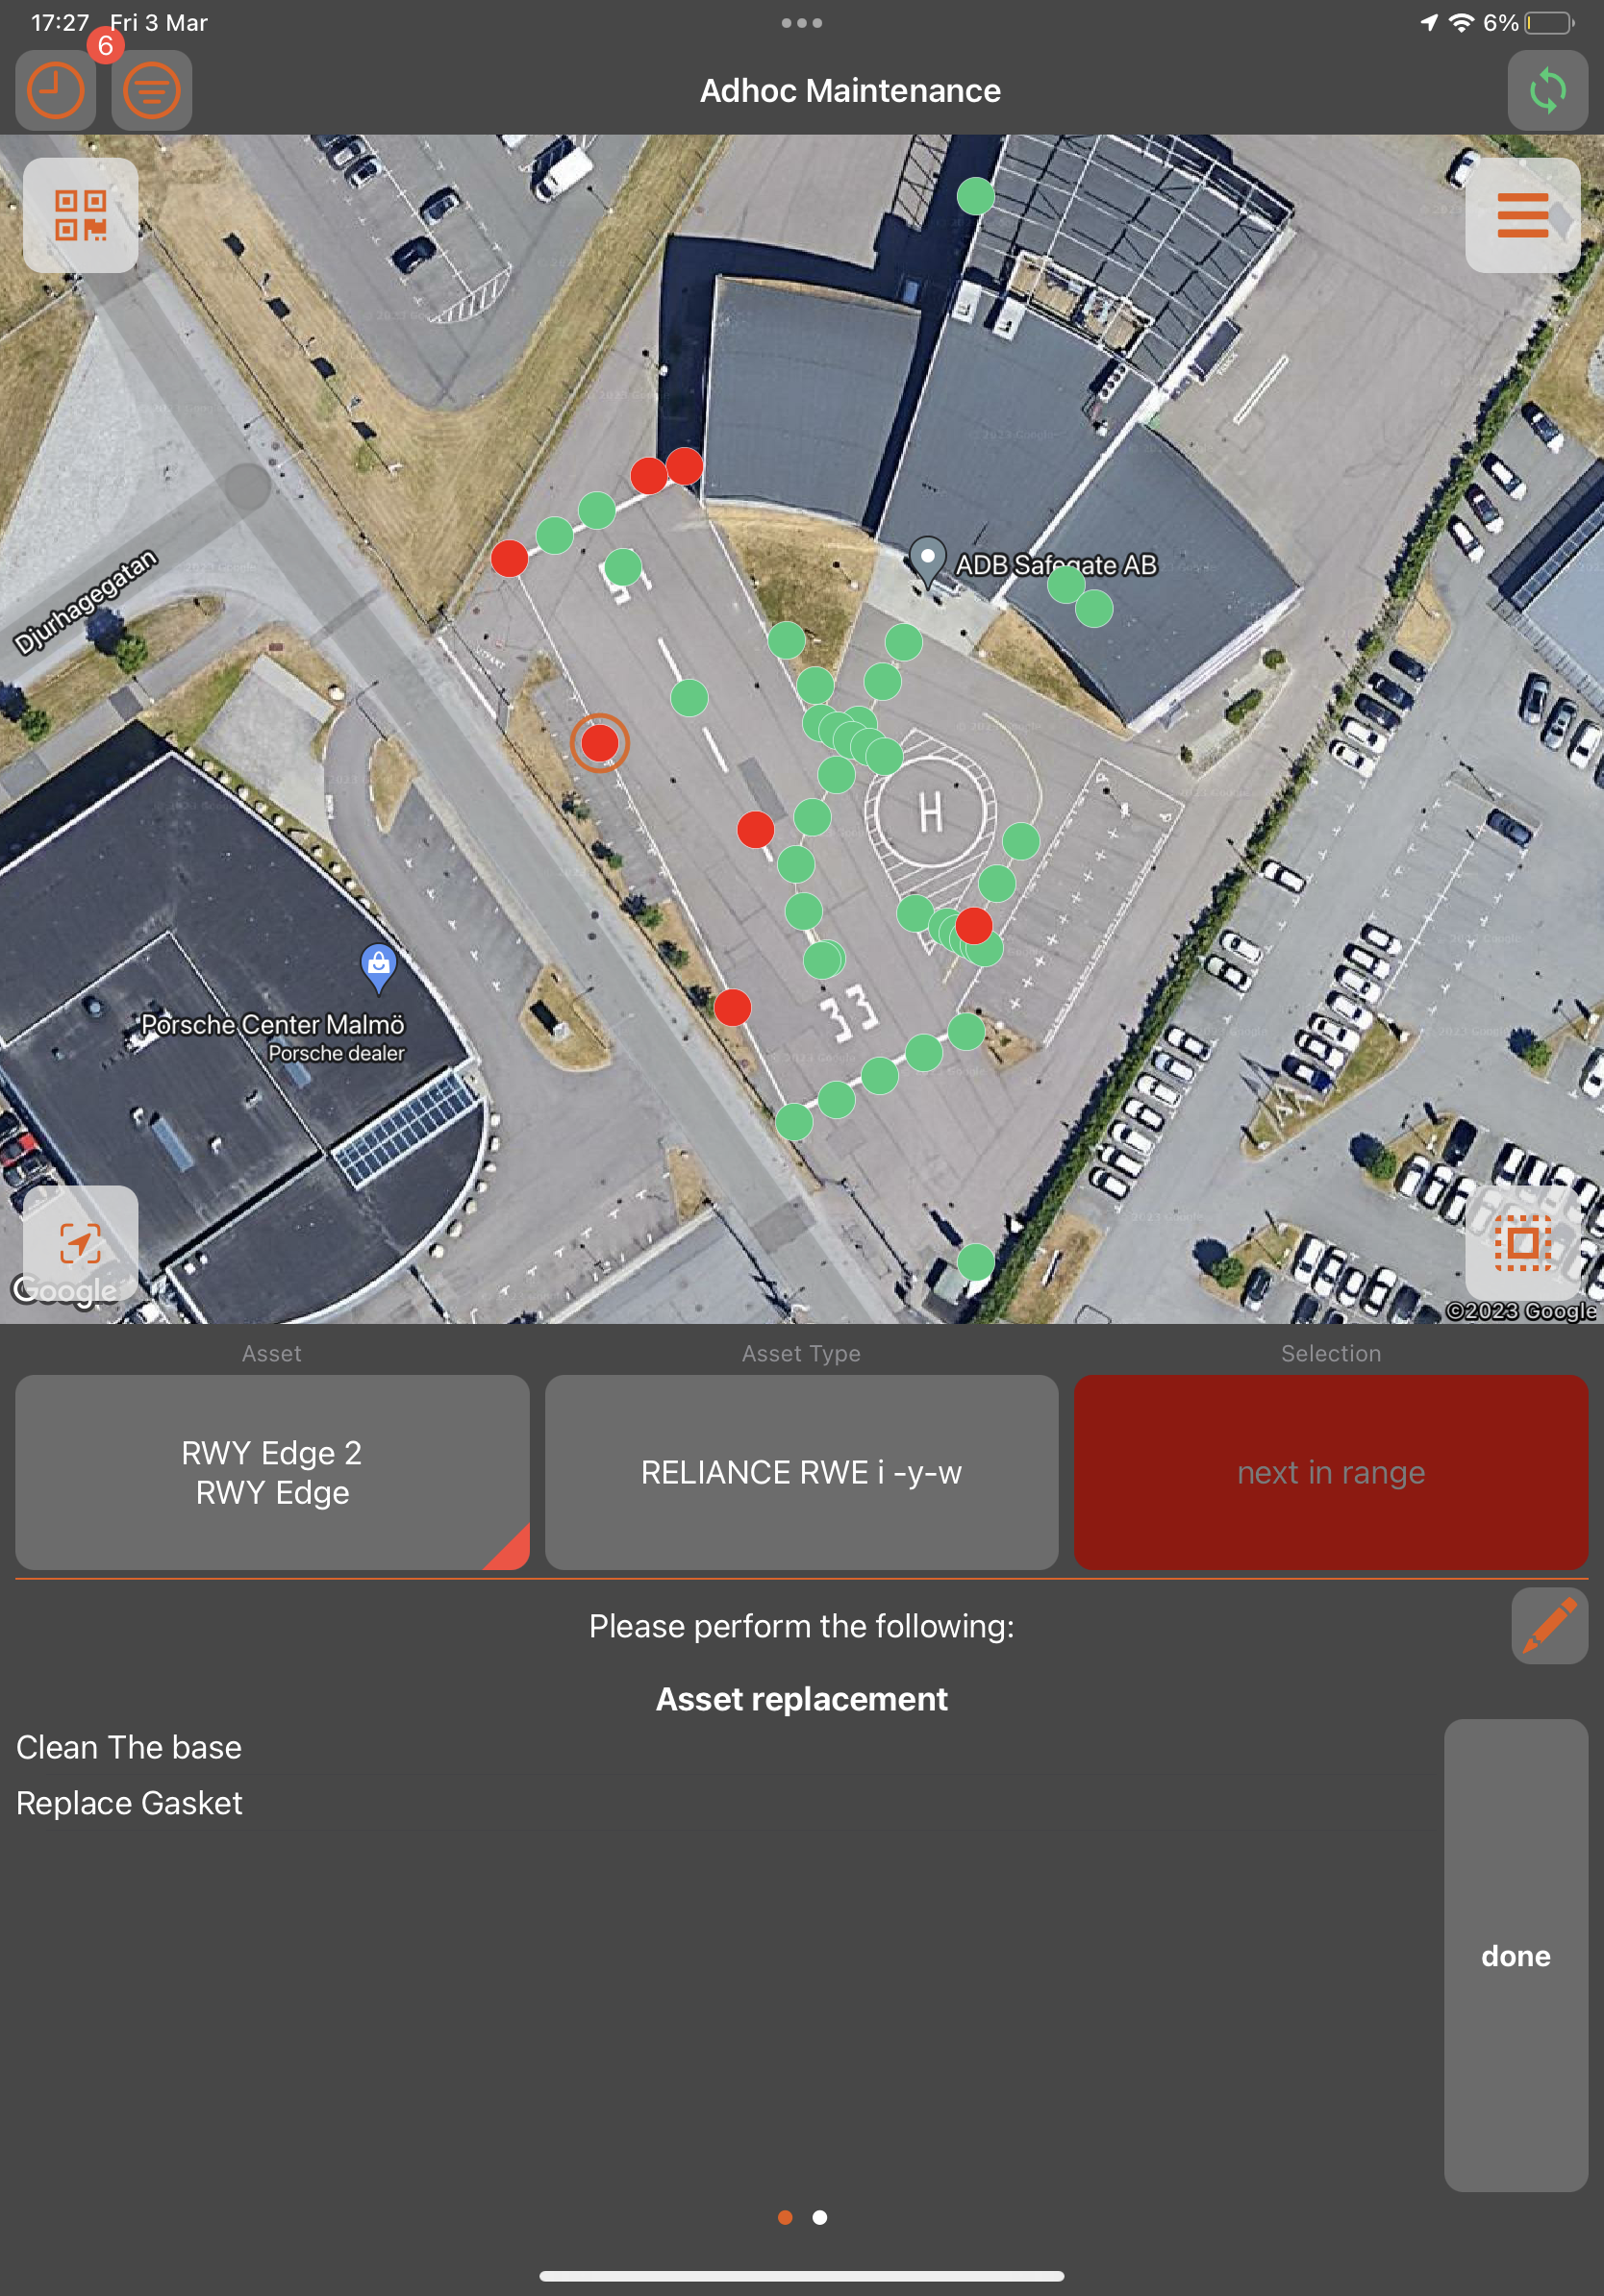
Use the Map settings and/or filters to find a certain asset and select it on the map or scan a QR.
Upon successful identification of the asset you will be able to see the details of the assets in the bottom left corner. Please check that you have selected the correct asset at this time
You can now select the Maintenance tab which will allow you to select the appropriate task to be performed from the selector. Any maintenance task defined in the web-application can now be selected. The tasks highlighted in orange are tasks that are defined in the preventive maintenance tasks of the asset.
Start the maintenance registration by hitting the "Done" button next to the selected task and following the instructions on the screen. Press “save” to validate the maintenance action.
When a task is selected with a Torque validation , you can perform the torqueing procedure as you would during Scheduled Maintenance. Alternatively you can also enter the torque value manually when the torque wrench is not used.
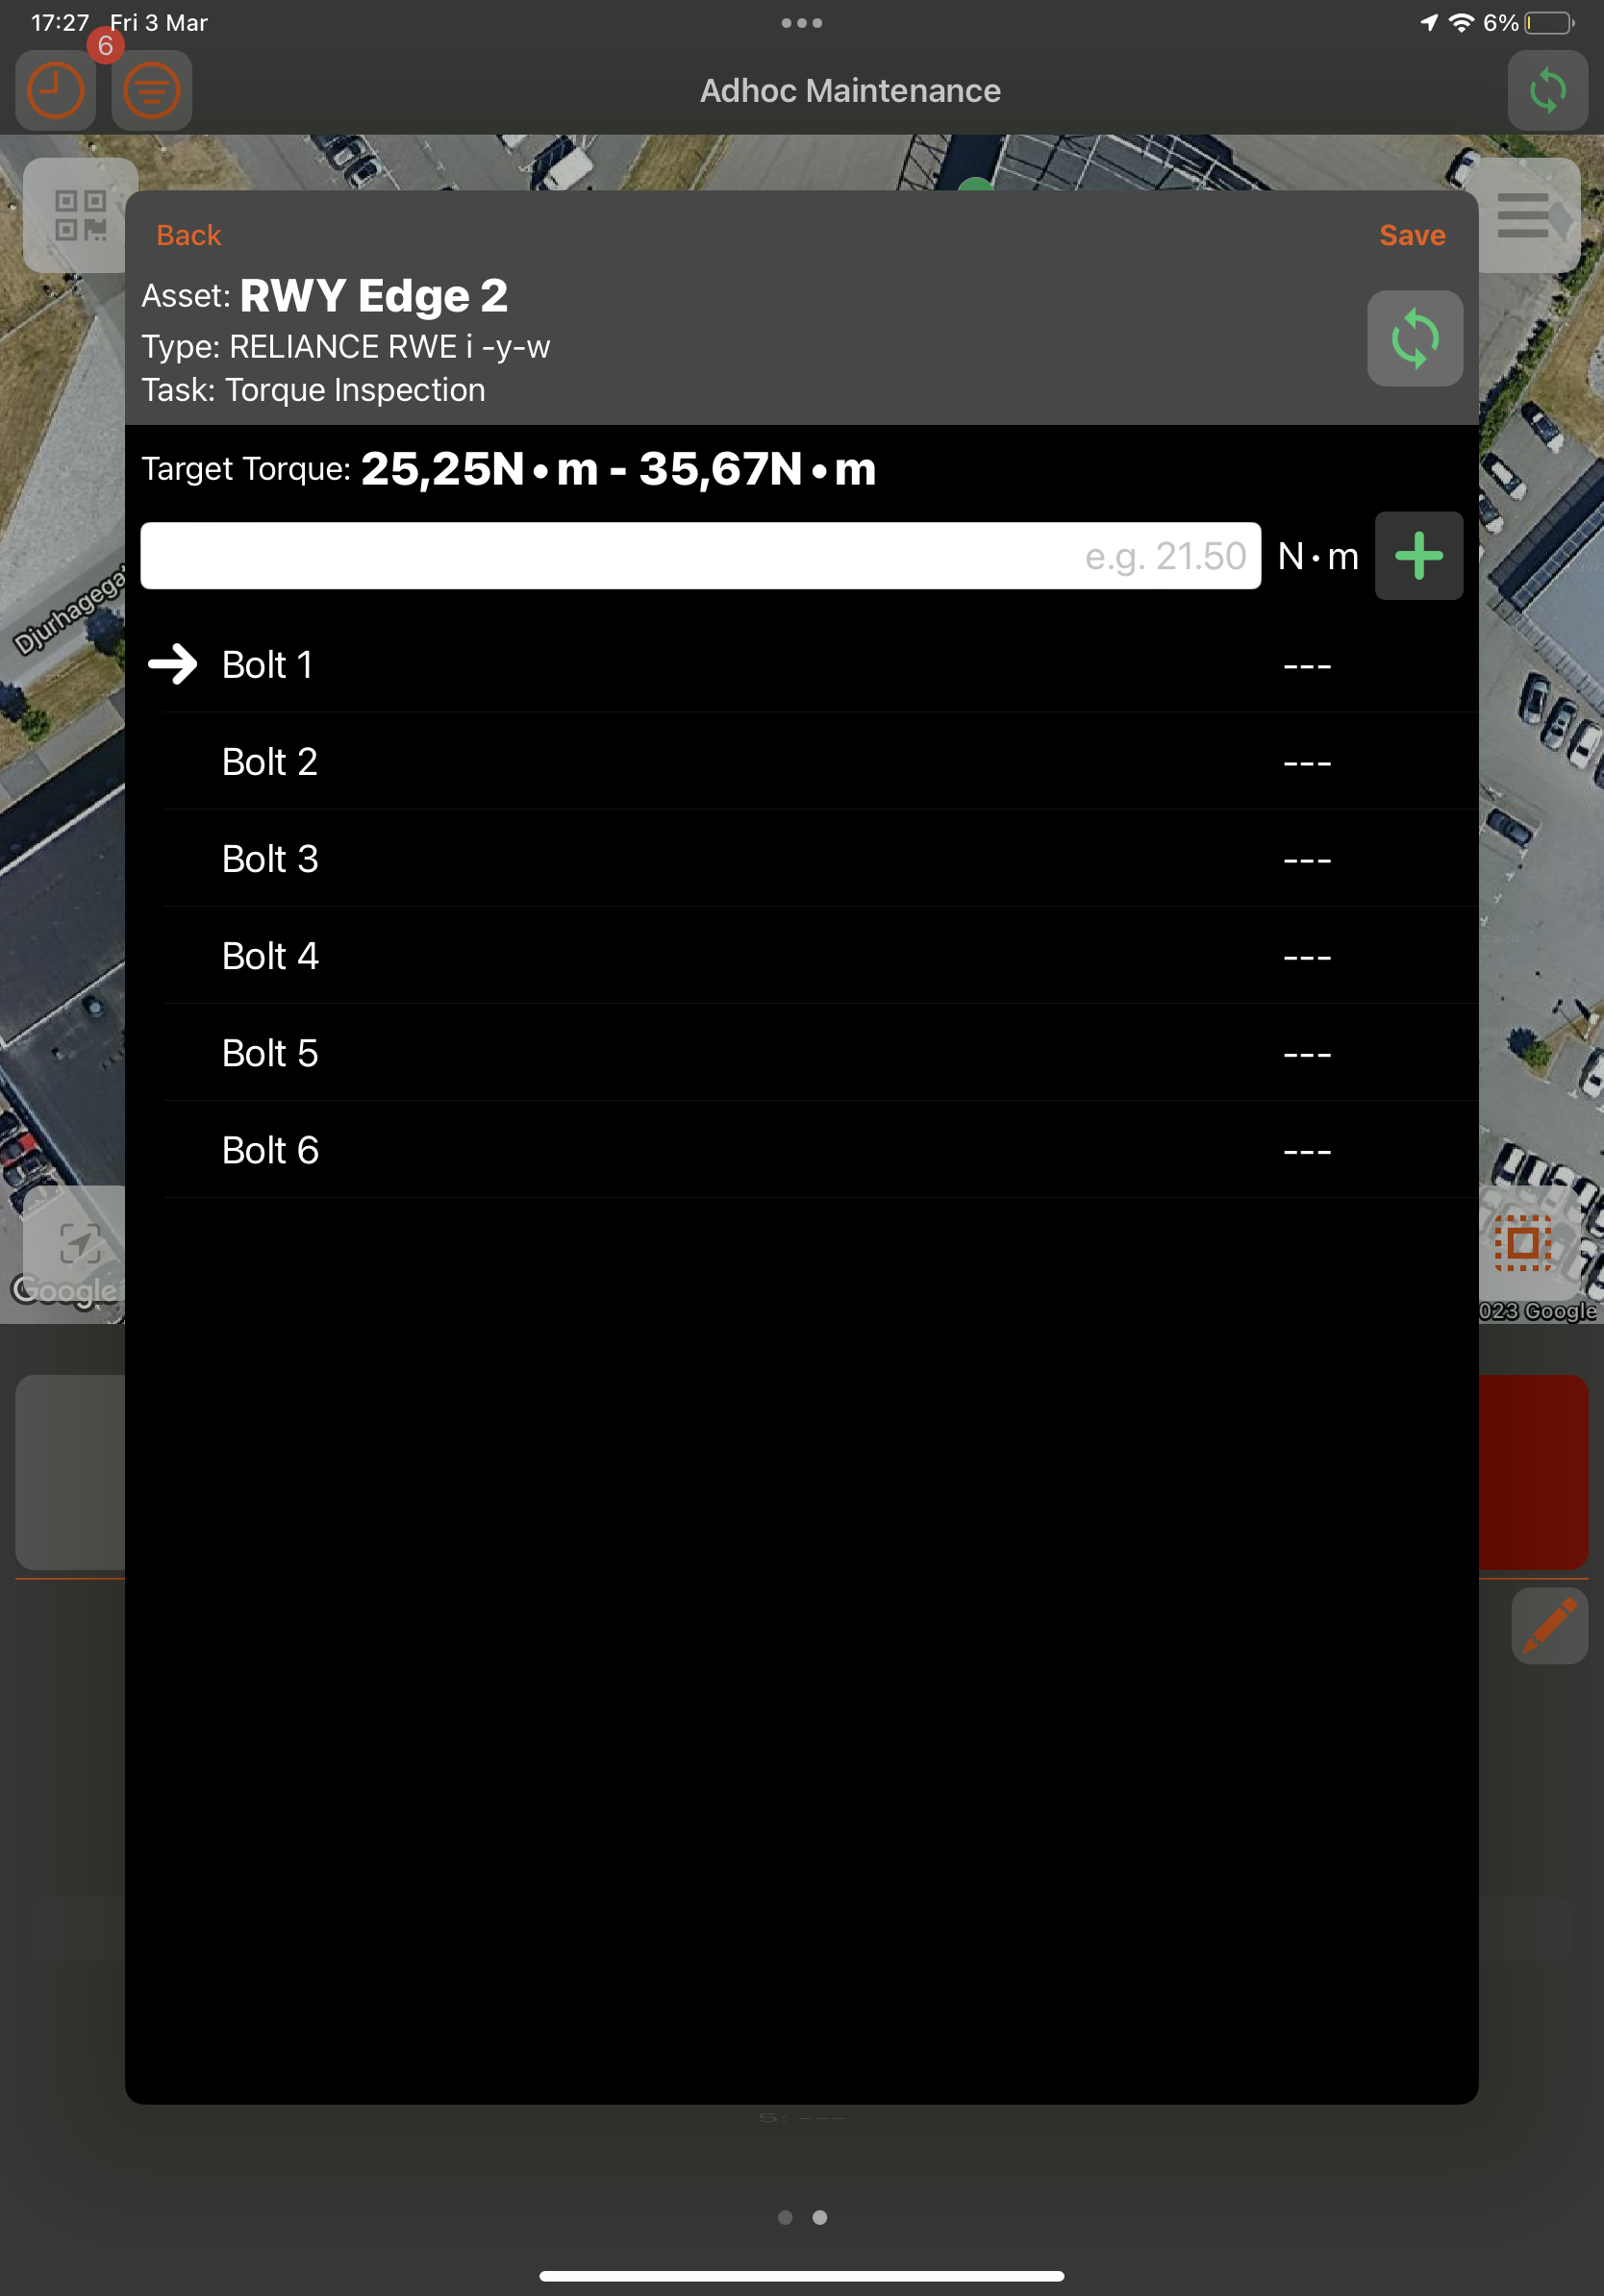
Torque values received from the torque wrench are displayed on the right for the respective fixing point. Green indicates a good torque value as opposed to red indicating a torque value that is either too low or exceeds the pre-defined torque value.
Complete the ad-hoc maintenance session by selecting the Save button.
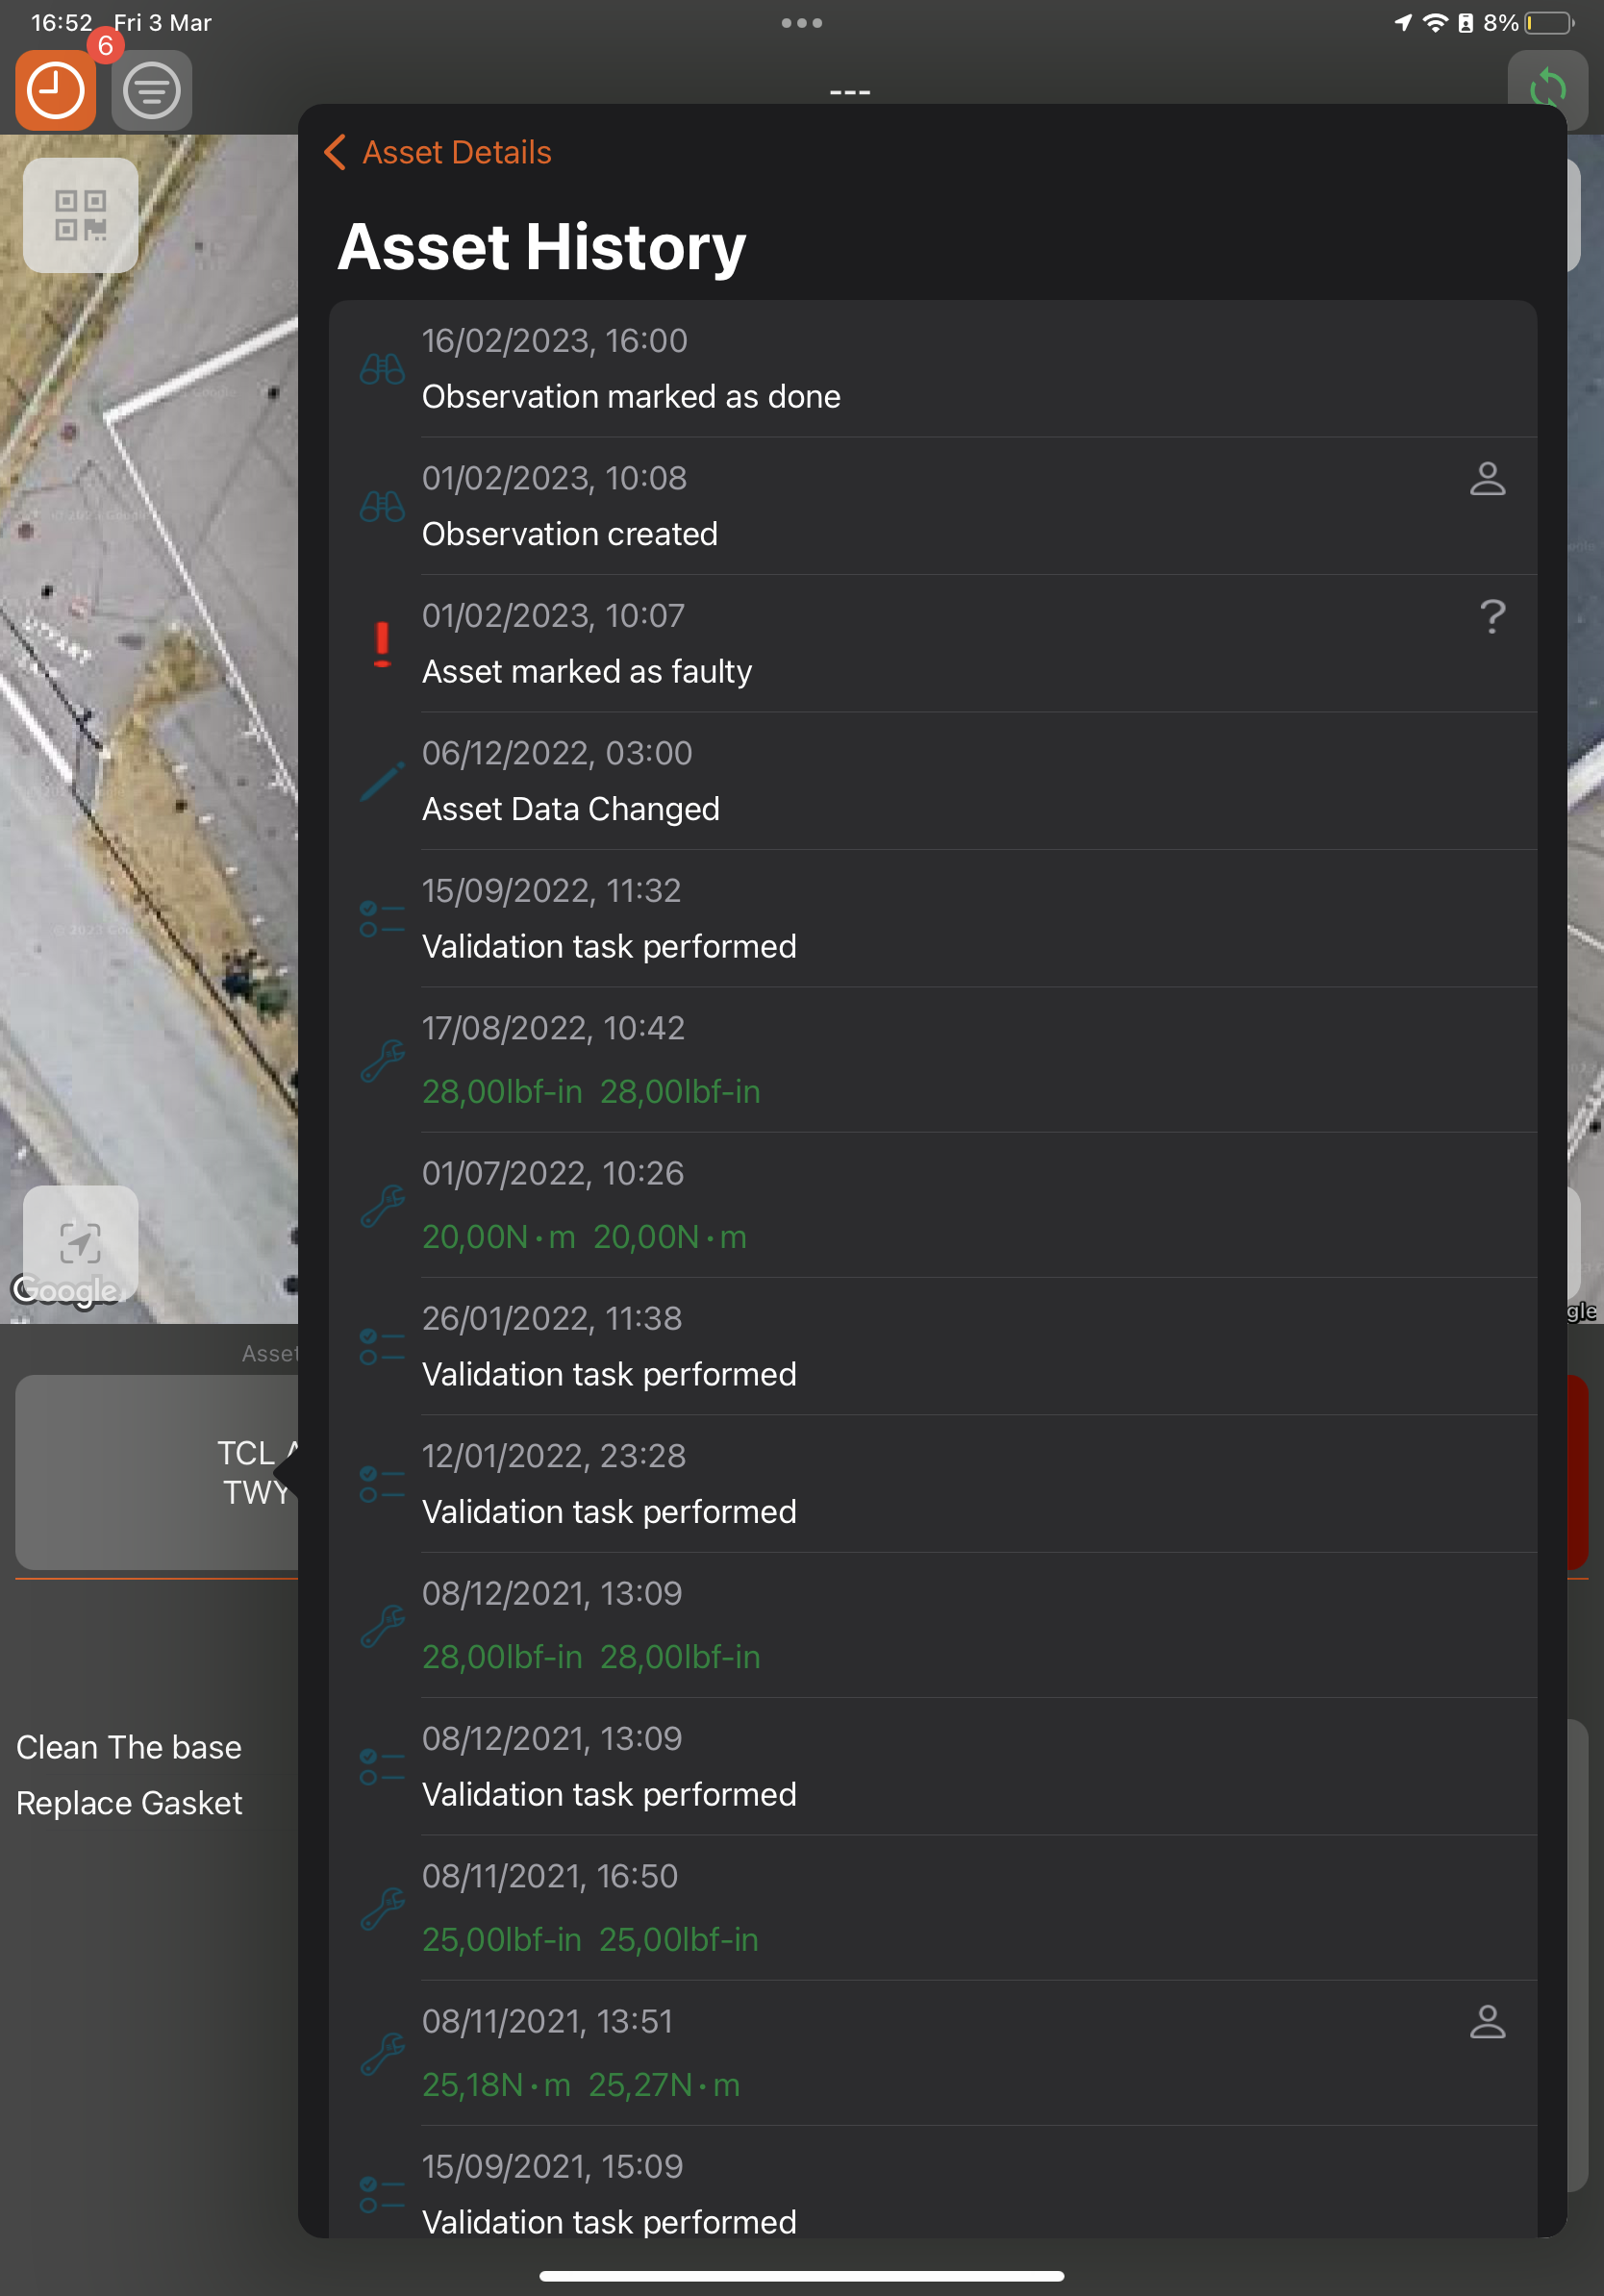
History
This tab gives you the possibility to view all activity performed a specific asset on a time-line with date and hour. These activities include the maintenance activities from shifts, ad-hoc and observations (Photo's - notes and voice memos ) ![]() The selection method on how the asset was identified is also mentioned in this history - This can be critical in knowing whether the person who performed or reported the maintenance was physically on-site.
The selection method on how the asset was identified is also mentioned in this history - This can be critical in knowing whether the person who performed or reported the maintenance was physically on-site.
QR identification | Locaton based | User selected |
|---|---|---|
 |  |  |
< Back To CORTEX Service Manual overview