Torque shifts
Torque Workorder Maintenance
Some Images and descriptions might varry to the current release due to updates of the application over time. The general usage however should be similar.
Torque Workorders and preventive maintenance tasks are planned where there is a need to prove the peak torque that was put on one or more bolts. Because ALIS can connect to an electronic torque wrench, we can read out this peak torque value and attach it to the work report of this maintenance task.
Setting up the hardware - Tochnichi Wrench & Ingersoll Rand QX BLE
Assembling the Torque wrench
Mount the extension bar with the torque wrench with the 1/2" quick lock connection.
Now, mount the iPhone, using the Quadlock mount, by placing the iPhone at 45° against the mount connection, push it slightly towards the mount and rotate it another 45° . Whether the iPhone is used in Portrait or landscape is up to the preference of the user.
Clamp the Trimble Location Device on the shoulder or the back of the neck - for best location accuracy *
*The higher the Trimble is mounted the less interference the device has from locating satellites due to blocking of the human body.
Connecting the Wrench to the iPhone
Because the AIRTorque Tohinchi wrench and Ingersoll QX BLE is using the latest bluetooth technology, simply powering ON the wrench will establish the connection with ALIS Personal. ( If the wrench was paired earlier with this iPhone - if not please see ALIS hardware - First time use.) In the connection center under "Device Connections"> "Paired wrench" you can see the status of the connection to the wrench.
Power will be automatically turned off after 3 minutes without any key operation or any torque load. In case of a "LoBatt" alarm (low battery) condition, it turns off after 1 minute without use.
Setting up the hardware - Trimble
-Optional- Connecting the Trimble to the iPhone
Power ON the Trimble R1 Location Device by pushing the power button until you have 2 green LED's and release the power button - For more info on the Trimble GPS device please find it in the ALIS Devices Info. Upon the Blue flashing of the right LED Open the connection center in your ALIS Personal and go to "Device connections". Under Location Devices you can now tap the connect button - A pop-up will show where, after a few seconds, you can select the Trimble Device ( named "GNSS:xxxxx " ). Make sure you connect to the Trimble device that is paired with this iPhone. If you would need to connect to another Trimble, please view the ALIS hardware - First time use page under Trimble connection.
The device is now connected and Paired to the iPhone. When the Trimble R1 is running firmware v5.44 or higher the device will automatically reconnect to it's last connected device. If this does not happen, please update your Trimble device.
![]() To shut down the Trimble device Hold down the power button until you have 1 red LED then release the power button . For more info on the Trimble GPS device please find it in the ALIS Devices Info.
To shut down the Trimble device Hold down the power button until you have 1 red LED then release the power button . For more info on the Trimble GPS device please find it in the ALIS Devices Info.
Starting the Workorder
From the Workorder list ( top right button ) select the desired workorder. The assets to be maintained are shown on the map. The color coding is as following:
BLUE = asset to be maintained on Workorder
GRAY = asset not to be maintained on Workorder
GREEN = asset maintained during Workorder
RED (on iPad) = observation added on this asset
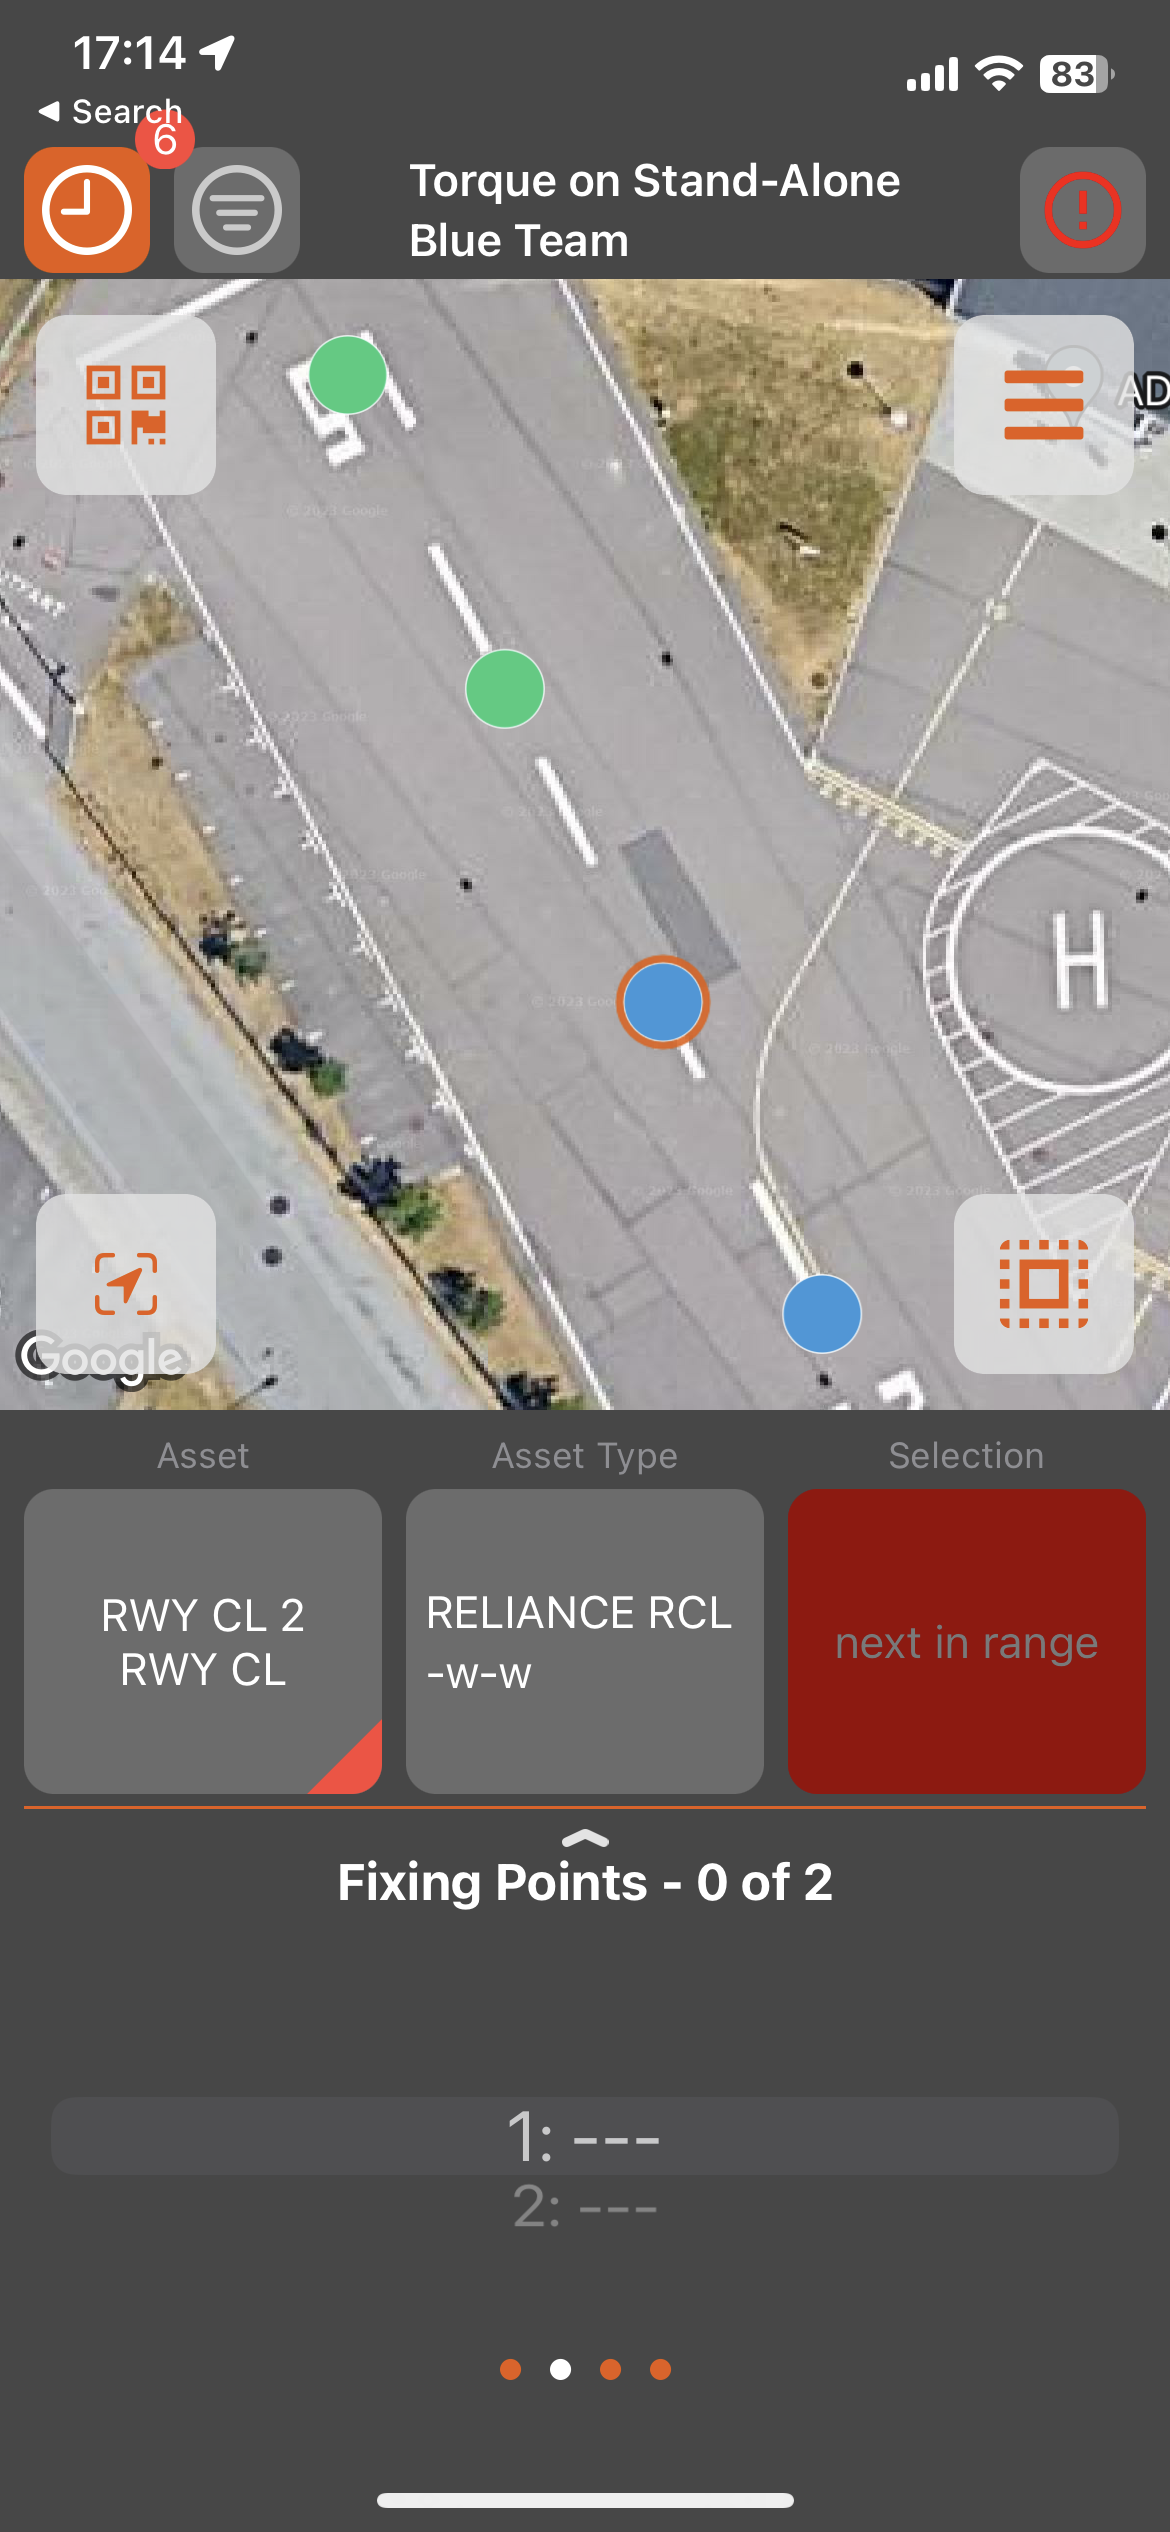
The technician approaches the asset to be maintained. ALIS personal will automatically identify the asset that needs to be maintained and select it. Depending on the vicinity of other assets, the system can be in three different stages concerning the certainty of the identification of the asset selection toggle button
The button is GREEN = the system is certain that it has selected the right asset you need to maintain - you can continue without hesitation
The button is Orange = there are one or more assets nearby that could be potential candidates of what you need to maintain - please verify on the map and your location awareness which one you need to maintain - you can toggle the asset selection by pushing on the button.
The button is Red = the system has not identified any assets in your near vicinity that should be maintained -
 You can still tap on the asset in the map if you know which asset you need to maintain.
A possible reason for the system to not detect the right asset could beThe GPS location registered in the system for the asset does not correspond with the actual location of the asset.
The GPS device does not have a good satellite reception, which results in a inaccurate location representation on the device. Please see the Trimble information page for more info on the Trimble GPS location device.
Upon identification of the asset, proceed to torque the fixing points of the respective asset. The digital reading on the torque wrench will indicate the amount of torque being applied.
Tohnichi Wrench Users
If using the Tohnichi wrench, Once the appropriate amount of torque has been reached (confirmed by an audio signal from the wrench), release torque tension on the bolt and submit the final torque value to ALIS Personal by pressing the orange ‘Submit’ button located under your right thumb on the wrench . Submission confirmation will be indicated on the iPhone.
Ingersoll Rand Wrench Users
If using the Ingersoll Rand wrench, once the trigger is pulled, the wrench will go to the set torque and will chime when torque has been reached and stop. Trigger should be applied until torque has been reached. The wrench will stop at the desired torque, so the operator does not have to stop the wrench when getting close to the target range.
Readings on the IR wrench will be submitted automatically and the reading will be displayed on the iPhone.
![]() If there is NO confirmation on the iPhone the value was not registered in the system! Please check your connection to the wrench!
If there is NO confirmation on the iPhone the value was not registered in the system! Please check your connection to the wrench!![]() If the release of the torque tension is not performed, the value will not be submitted. (Tohnichi wrench)
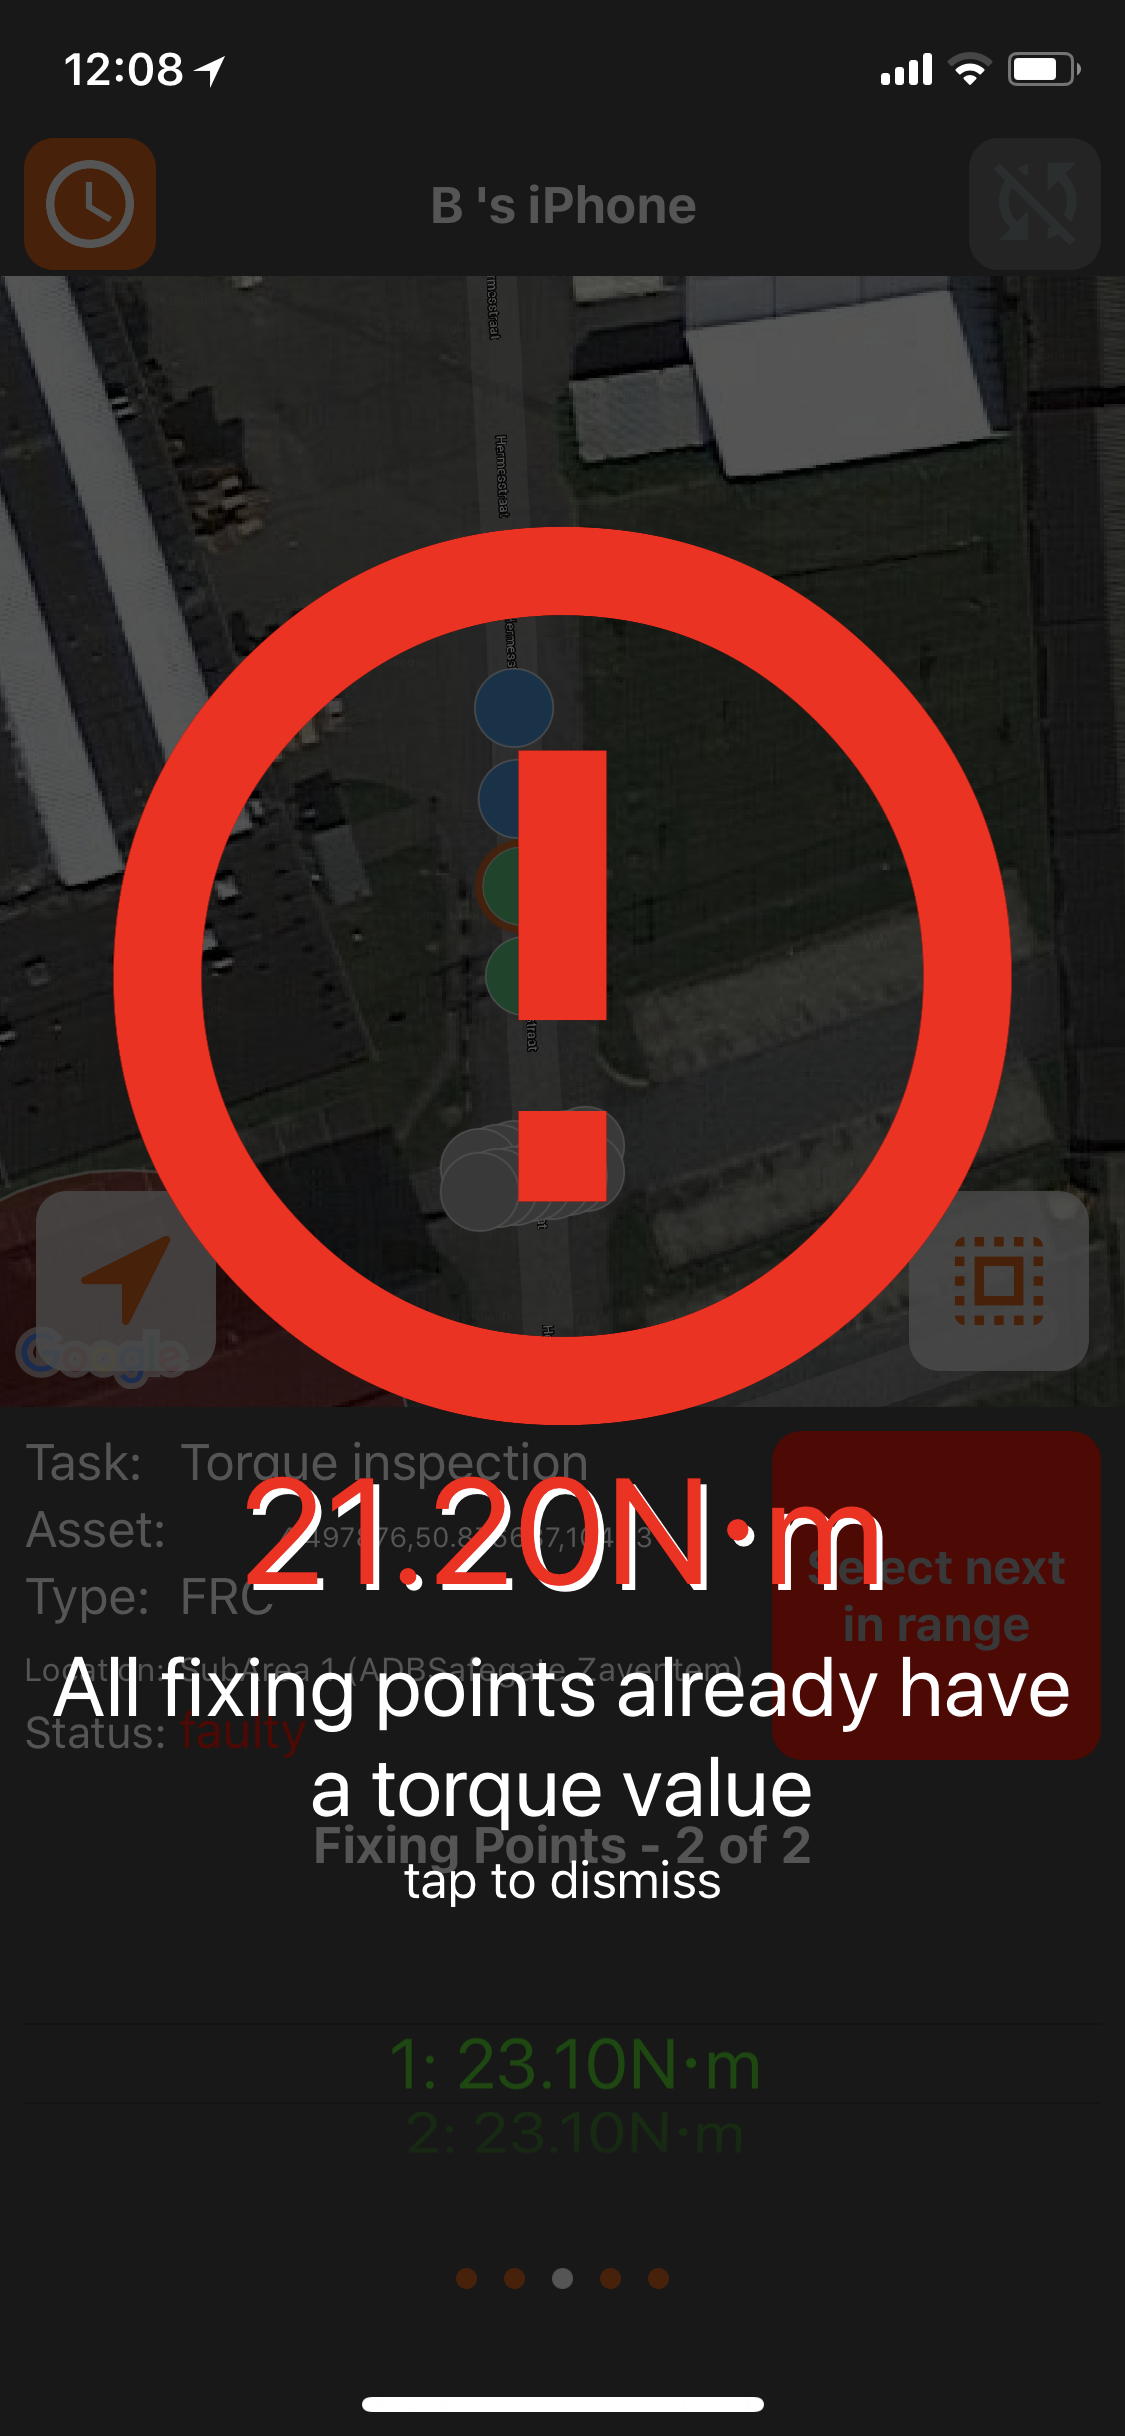
If the release of the torque tension is not performed, the value will not be submitted. (Tohnichi wrench)![]() Should the torque value exceed or be inferior to the predefined torque value (For example* 23Nm +- 15%Nm), the torque wrench will respond with an Error
Should the torque value exceed or be inferior to the predefined torque value (For example* 23Nm +- 15%Nm), the torque wrench will respond with an Error
Successful Torque registration 1/2 bolts | Successful Torque registration all bolts |
|---|---|
.PNG?inst-v=c78283a6-69c9-4d07-ae86-a5e5fb6edb53) | 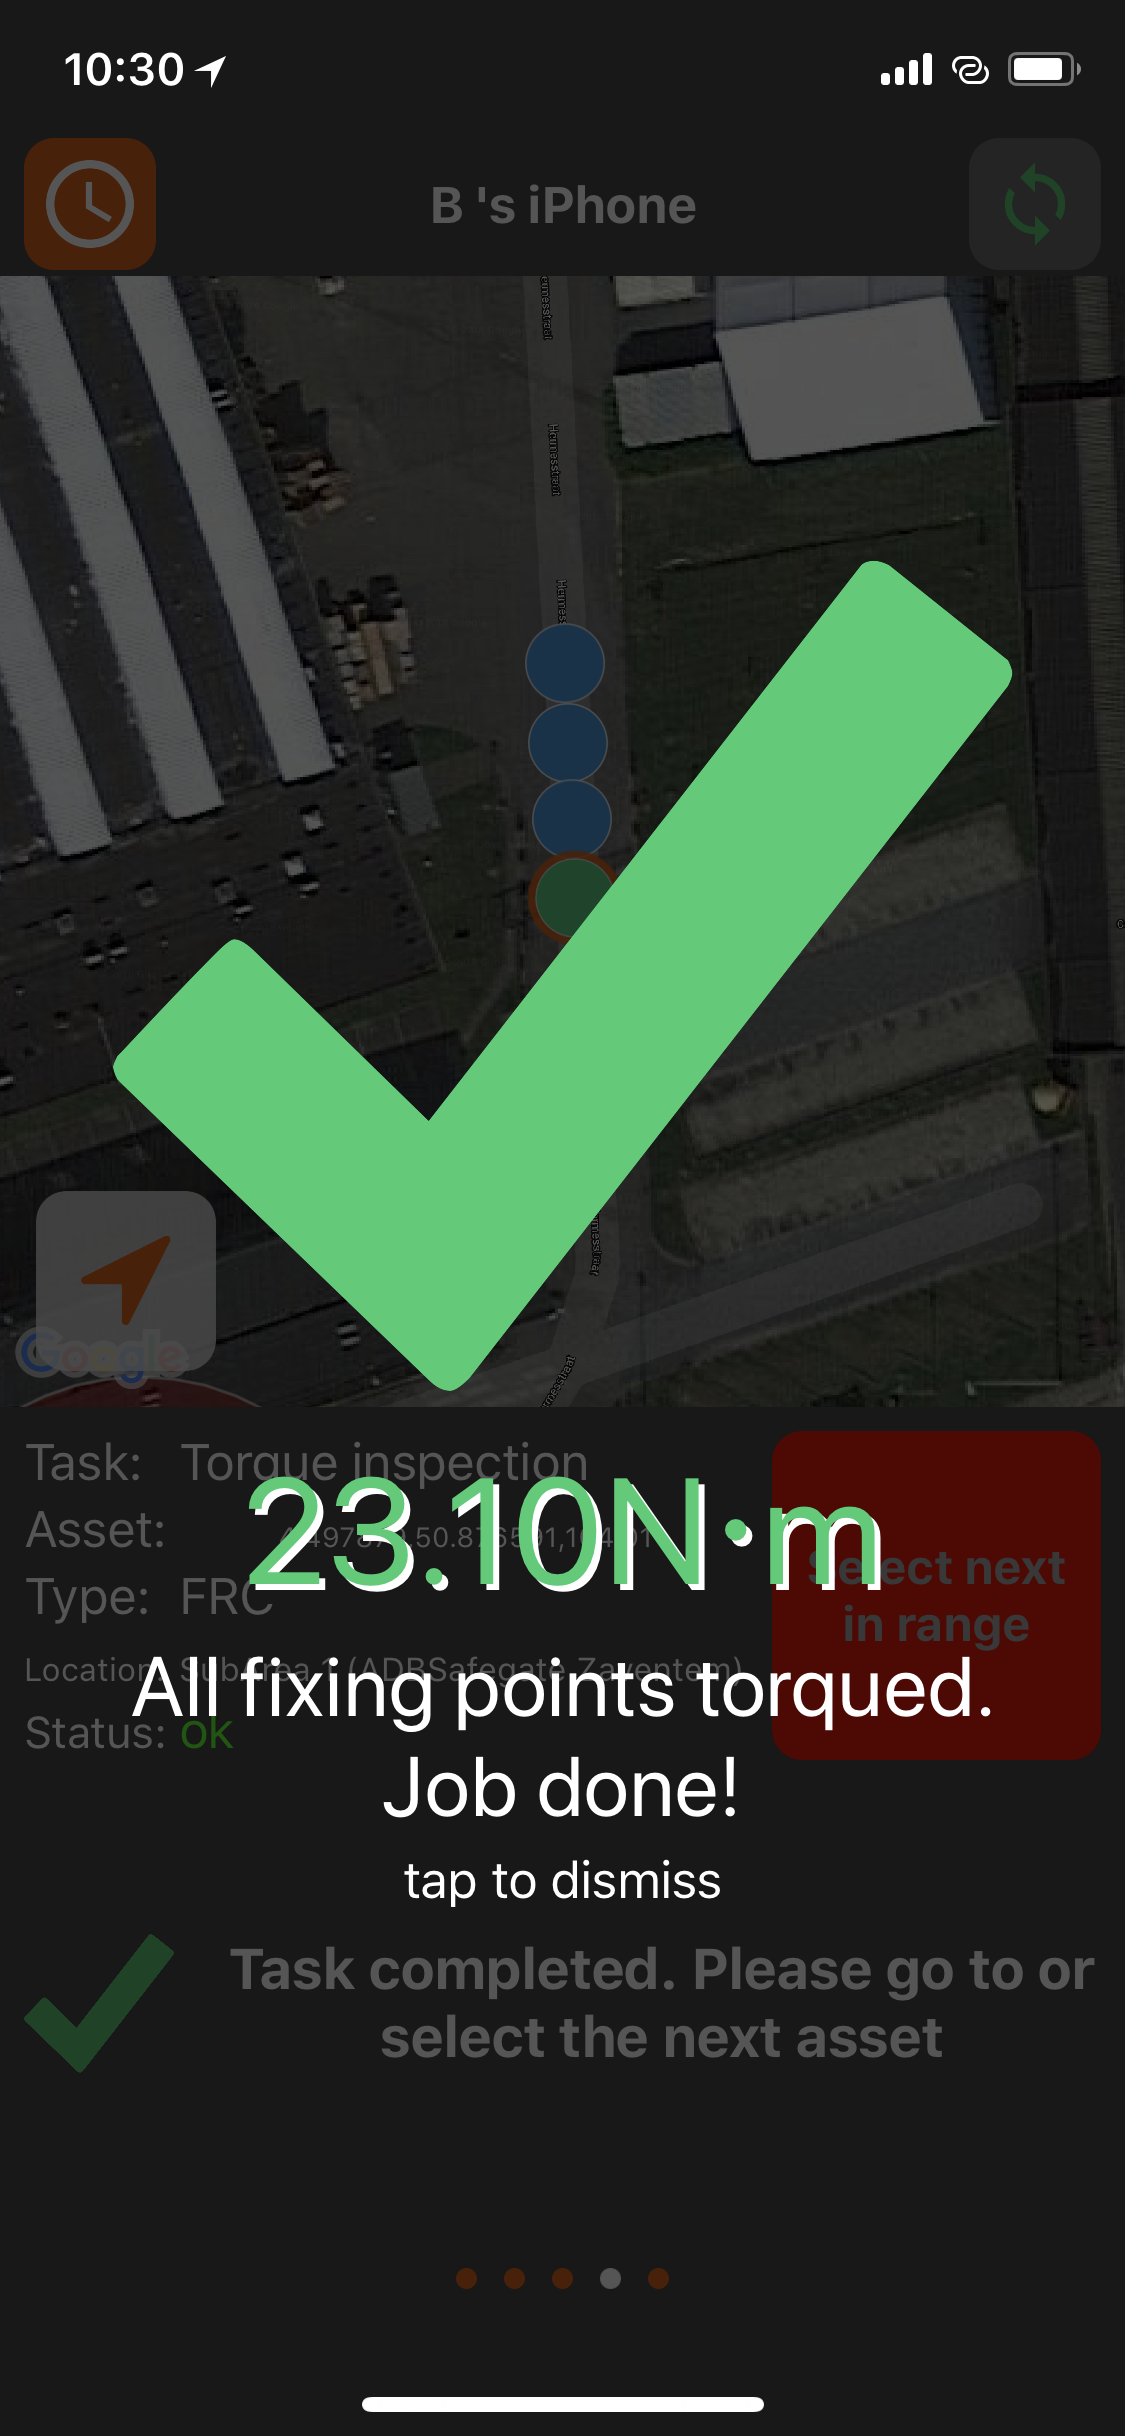 |
Unsuccessful torque | Unsuccessful torque | Unsuccessful torque |
|---|---|---|
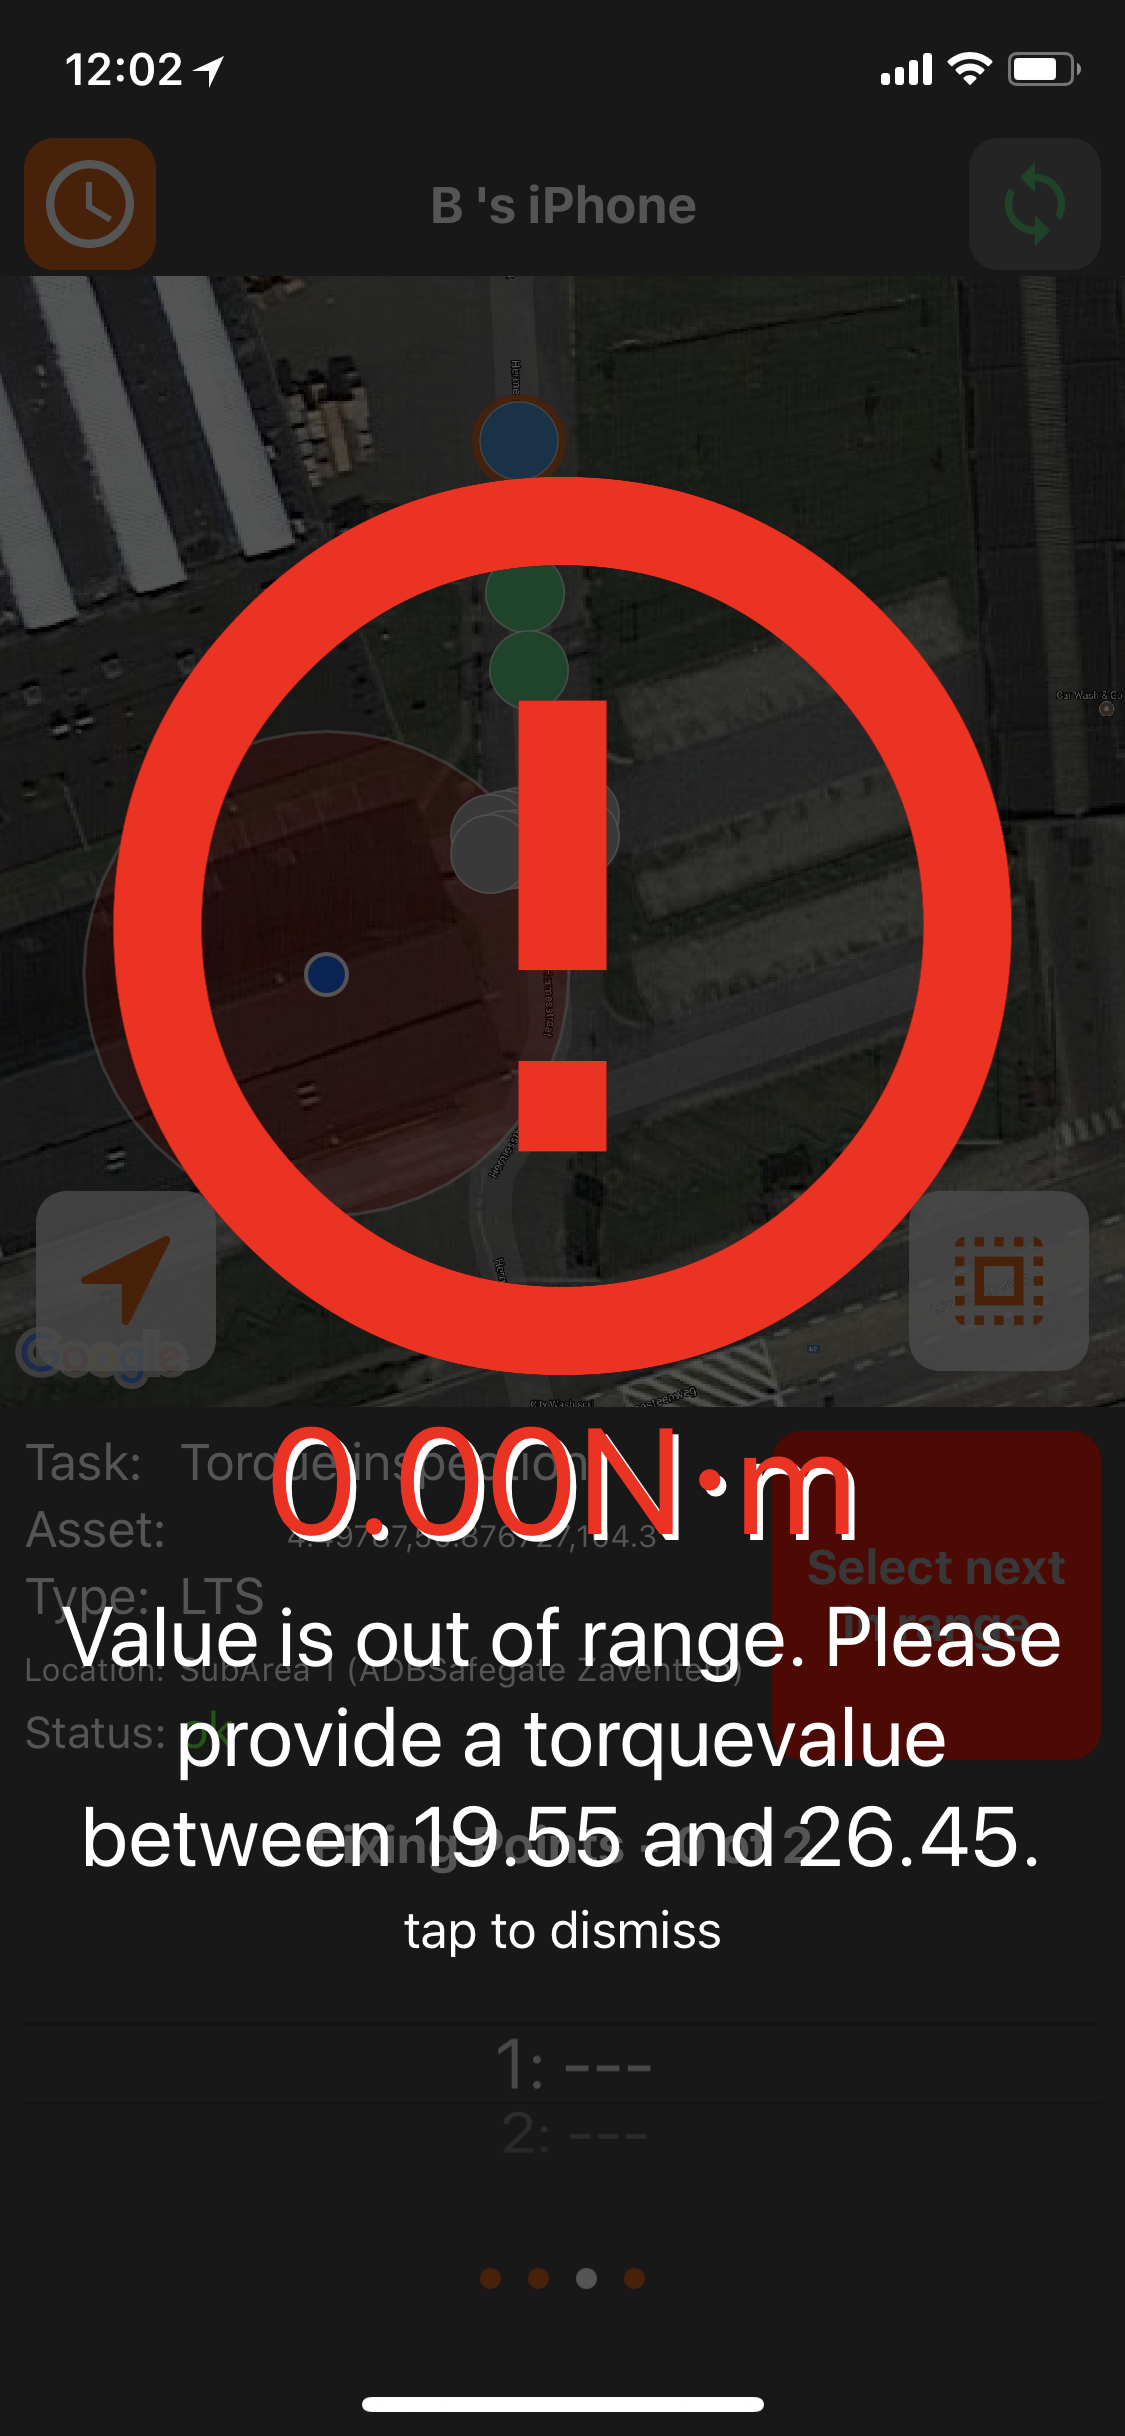 | 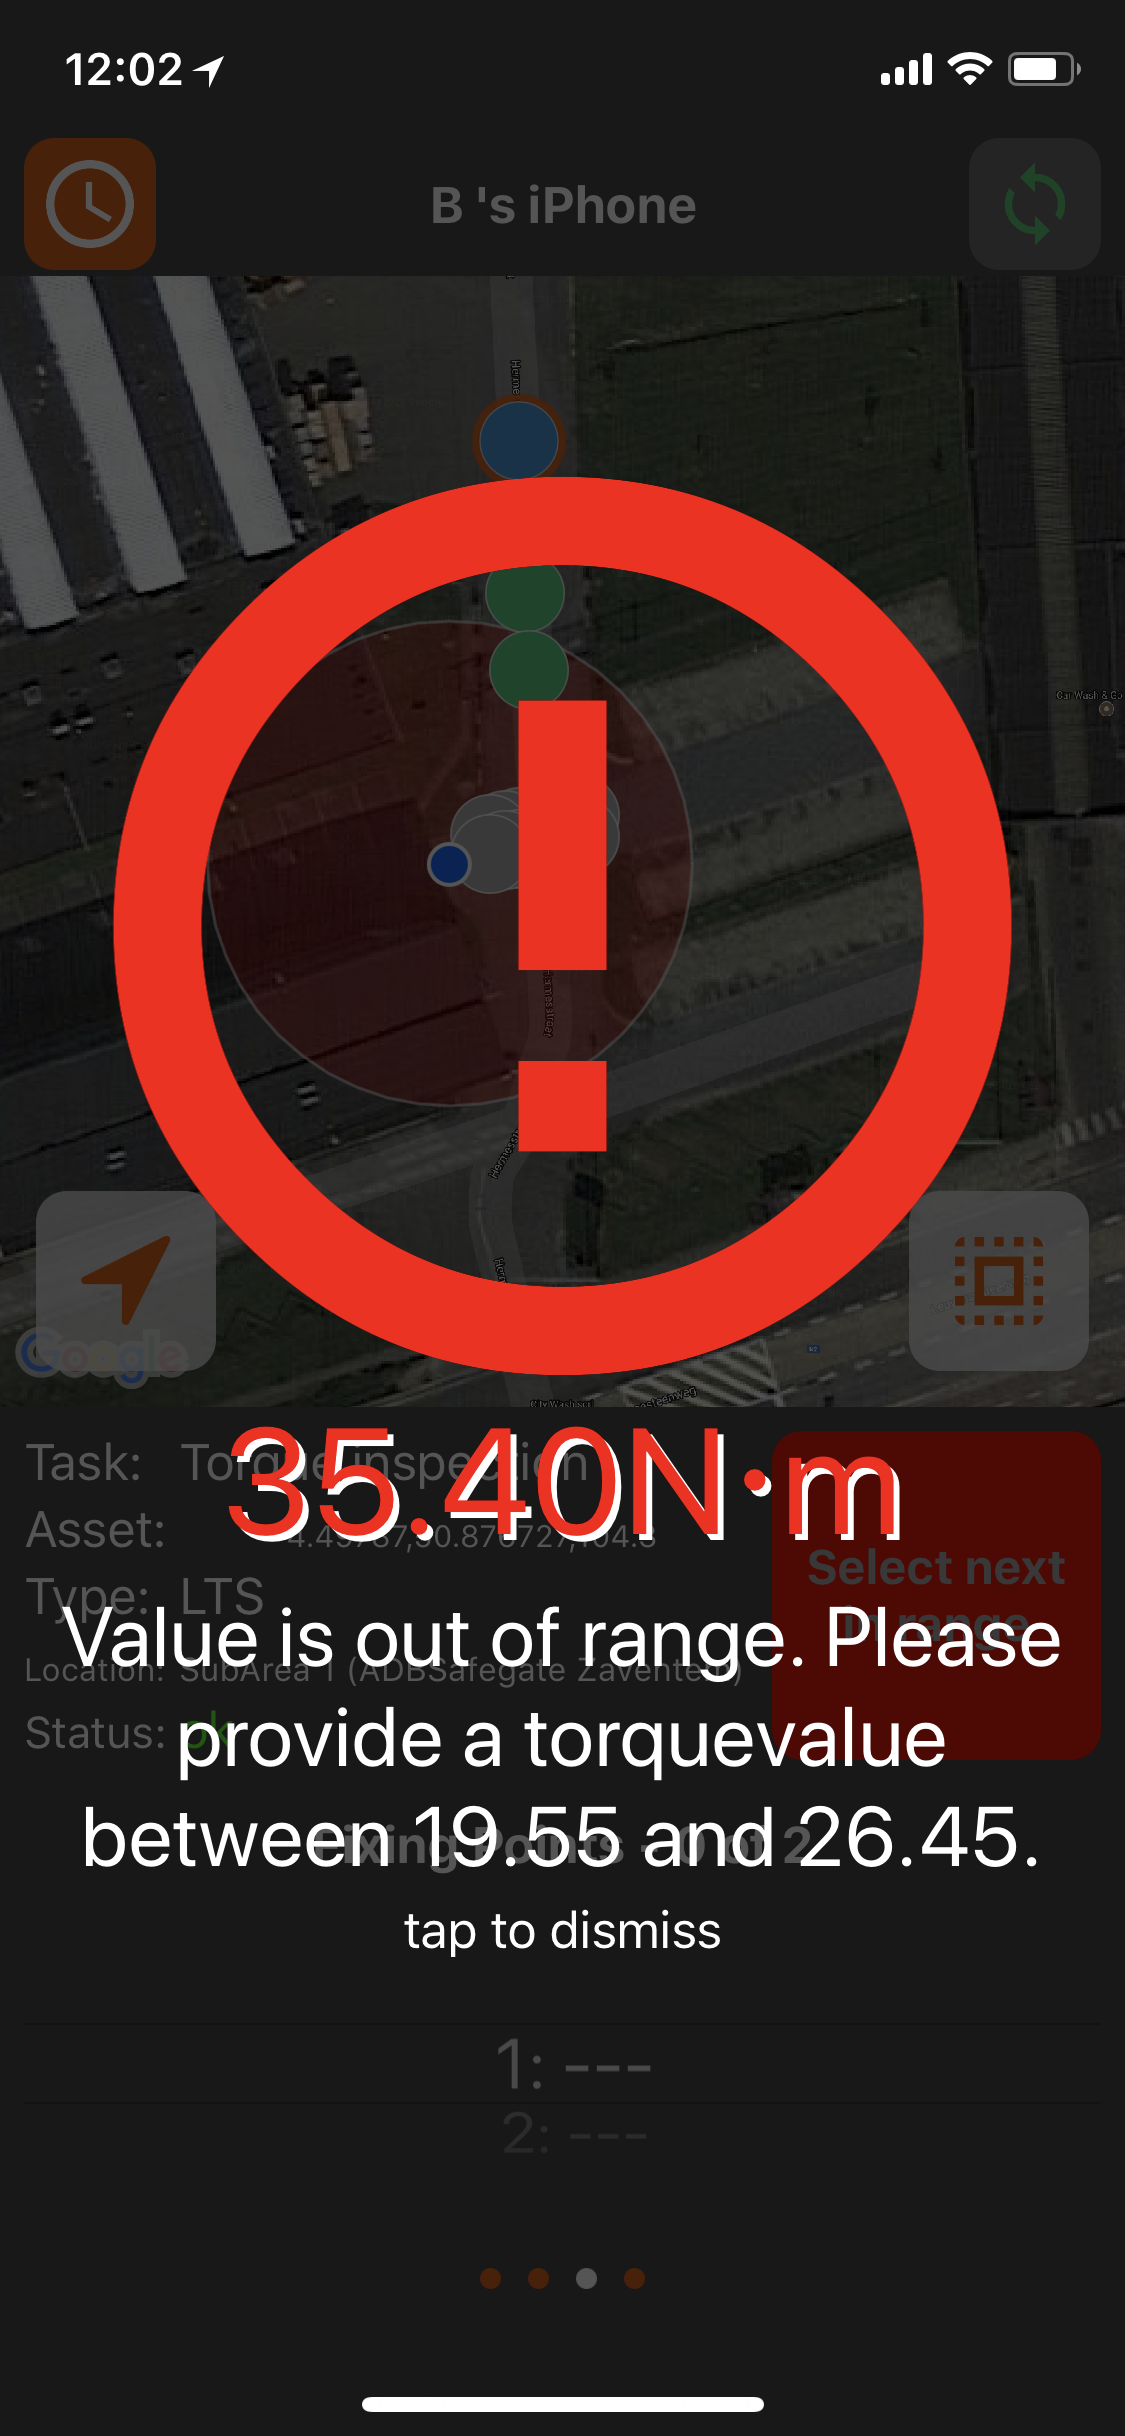 |  |
Starting from ALIS Version 2020.02 ( Release planned for summer 2020 ) with the introduction of the new Fixation status feature, the input method of Torque maintenance data is updated.
The torque value registration is similar as before Version 2020.02 but allows for the input of
Missing or damaged bolt ( Swipe line to the left of empty bolt value)
Removing incorrect registrations ( Swipe line to the left)
Values that are out of tolerance
Manual input of Torque information
Upon submitting the first Torque data submit of the asset , a pop-will appear with a more detailed view of the maintenance action and allowing for the actions described above.
The pop-up can also be accessed by hitting the chevron icon when an asset has been selected with a Torque maintenance task 
Step-by-step guide
To register a missing bolt for this asset
Verify you have the Torque details pop-up open or use the chevron to do so
Swipe the row of the missing bolt the left
A soft swipe will show the missing value button. Press the button to mark the value missing
A hard swipe will mark the button missing immediately
A note on the the bottom will inform you that you have registered a value out of tolerance.
Once all of the bolts are torqued ( or a manual value is inputted) the data can be saved
If the maintenance action is saved without an entry of all bolts there will be a pop-up to inform you that all no-date bolts will be marked as missing bolts.
Video of the missing bolt registration:
Screenshots of the Torque input method
.png?inst-v=c78283a6-69c9-4d07-ae86-a5e5fb6edb53)
.png?inst-v=c78283a6-69c9-4d07-ae86-a5e5fb6edb53)
.png?inst-v=c78283a6-69c9-4d07-ae86-a5e5fb6edb53)
.png?inst-v=c78283a6-69c9-4d07-ae86-a5e5fb6edb53)
.png?inst-v=c78283a6-69c9-4d07-ae86-a5e5fb6edb53)
.png?inst-v=c78283a6-69c9-4d07-ae86-a5e5fb6edb53)
.png?inst-v=c78283a6-69c9-4d07-ae86-a5e5fb6edb53)
.png?inst-v=c78283a6-69c9-4d07-ae86-a5e5fb6edb53)
The spinner on the bottom of the app will indicate the amount of bolts that need to be torqued and how much have already been done. Continue to torque and submit the values until all bolts are torqued.
Once all fixing points have been successfully fastened, the technician can now navigate themself to the next asset to be maintained. The system will start to scan again for new assets nearby to identify.
 If an asset was maintained under the Orange condition ( of the Asset selection toggle button ) and the next asset is in the same area - then this asset needs to be selected manually by tapping on the selection toggle button.
Once all assets have been maintained, there will be an information message in the "Workorder Summary" panel that the Workorder has been completed.
![]() Once an asset is validated as maintained, the data will be synched in real-time to the server. When a connection to the server cannot be achieved the data will be stored offline until the connection is restored on the iPhone as on the Ipad
Once an asset is validated as maintained, the data will be synched in real-time to the server. When a connection to the server cannot be achieved the data will be stored offline until the connection is restored on the iPhone as on the Ipad ![]() When multiple iPhones are used simultaneously in use, they will update the status of the work performed by the other ALIS Personal devices automatically.
When multiple iPhones are used simultaneously in use, they will update the status of the work performed by the other ALIS Personal devices automatically.
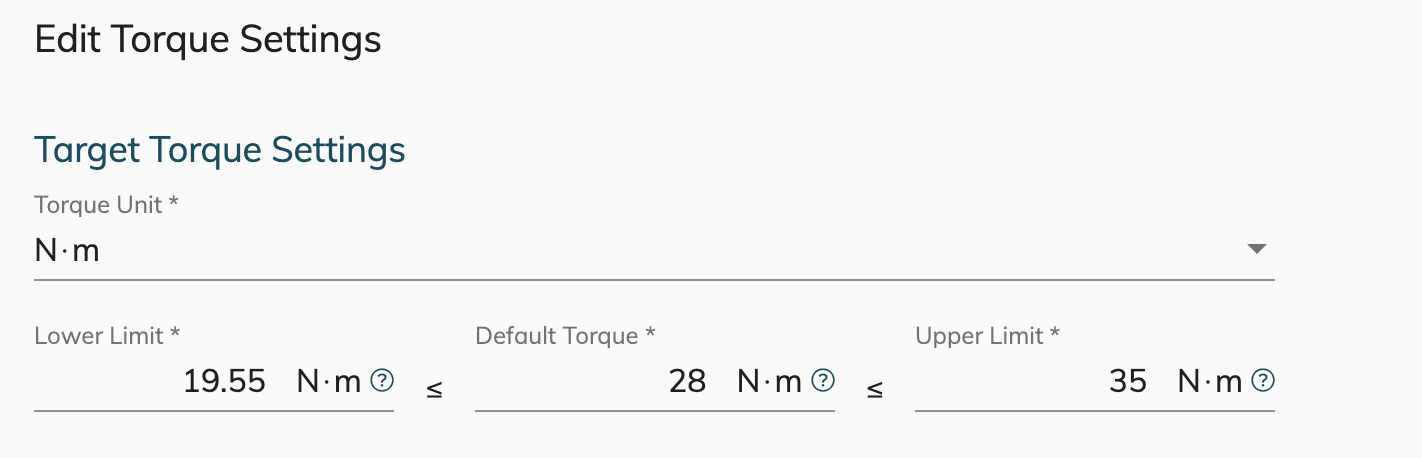
Torque Settings
*The torque setting that is accepted by the iPad / iPhones can be changed in the on the Webapp > Settings > Maintenance > Torque Settings .
< Back To ALIS Manual overview